GALSYNC GLOBAL ADDRESS LIST SYNCHRONIZATION
This guide is aimed at system administrators who are capable of connecting to remote systems such as Google Workspace (formerly G Suite) for Business and Office 365 Admin Panel.
Even if the new Cloudiway interface is user-friendly, GALSync is usually a detailed setup that requires a high level of competence and experience with mail systems and directories.
1. Introduction to GALSync
1.1. Global Address List Synchronization
This guide provides steps for setting up GALSync using the Cloudiway platform. GALSync stands for Global Address List Synchronization.
The goal of a GAL Synchronization is to keep the address books up to date by creating users and groups from one side as contacts (or Mail users or Guest users) on the other side.
Although we provide support for our own products, we do not provide support for third-party products such as PowerShell or server administration of Google or Exchange.
To help you, we have prepared a demonstration video for you!
1.2. How it works:
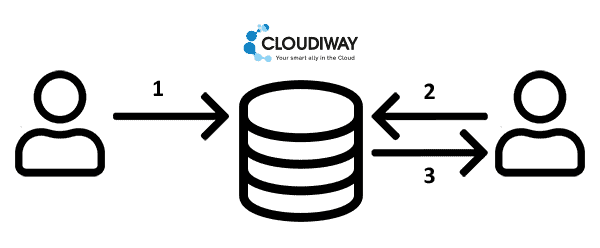
(1) Pull users & groups from source tenant. Contacts and guest users are not pulled out from the source, only users and groups.
(2) Pull contacts ( or Mail users or Guest users ) from the target tenant.
(3) Push new users or groups to target tenant as contacts ( or Mail users or Guest users ) and also push updates to previously created objects.
Note that source groups won’t be recreated as destination groups. Both source users and groups will be recreated at destination as contacts ( or Mail users or Guest users, except for source groups which won’t be recreated as guest users.).
1.3. Features
- Pull options: You can synchronize all your users and groups or granularly filter them.
- Filter by domain: You can select the Domain Names of the users and groups that you only want to synchronize.
- Filter by mail-enabled security group: You can include or exclude users that are members of specific security groups.
- Filter by object type: You can select to also synchronize groups and disabled users.
- Push options: Insert source users and groups into destination address book as Contacts ( or Mail enabled users or Guest users). Displayed or hidden from the address book. If you also selected to insert source groups into destination, keep in mind that they won’t be created as groups but as the selected target type: Contacts or Mail users. Source groups won’t be recreated in the target tenant as guest users.
- Simulation: A simulation mode is available to visualize and validate the changes before pushing them to the targets.
- Automatic schedule: Once the rules are in place and working correctly, you can schedule the execution and run it automatically at the time of your choice.
- Logs: Execution logs are available to keep track of the errors and changes.
- Google Workspace
- Office 365
- Exchange on-premises ( 2007 and later )
1.5. Performance & Security
We take your privacy and security seriously at Cloudiway, and we have invested significant effort into making our platform and your data secure. Cloudiway provides a cloud-based application hosted in Windows Azure… For more information about security, please refer to this article.
For more information about migration performance, please refer to this article.
2. GalSync Prerequisites
GALSync setup requires the assistance of our consulting team. Should you need help, please drop an email here.
2.1. Office 365 Service Account
The GALSync connector uses a mix of PowerShell commands and Graph API calls.
PowerShell command requires administrative privileges. The easiest approach is to use a tenant admin account. However, it’s possible to use an account with fewer privileges.
The following steps describe how to set up such account:
- You must use a licensed user account.
- This account must be able to run PowerShell commands.
- The service account must authenticate directly to Office 365 (no MFA, SSO, etc.)
- Using a different Global Admin account you must run Enable-OrganizationCustomization in Exchange Online PowerShell (https://docs.microsoft.com/en-us/powershell/module/exchange/enable-organizationcustomization?view=exchange-ps).
The account must be granted several roles:
- Go to the O365 Exchange Admin Center
- Select “Roles”
- Select “Admin roles”
- Create a new role group GalSync
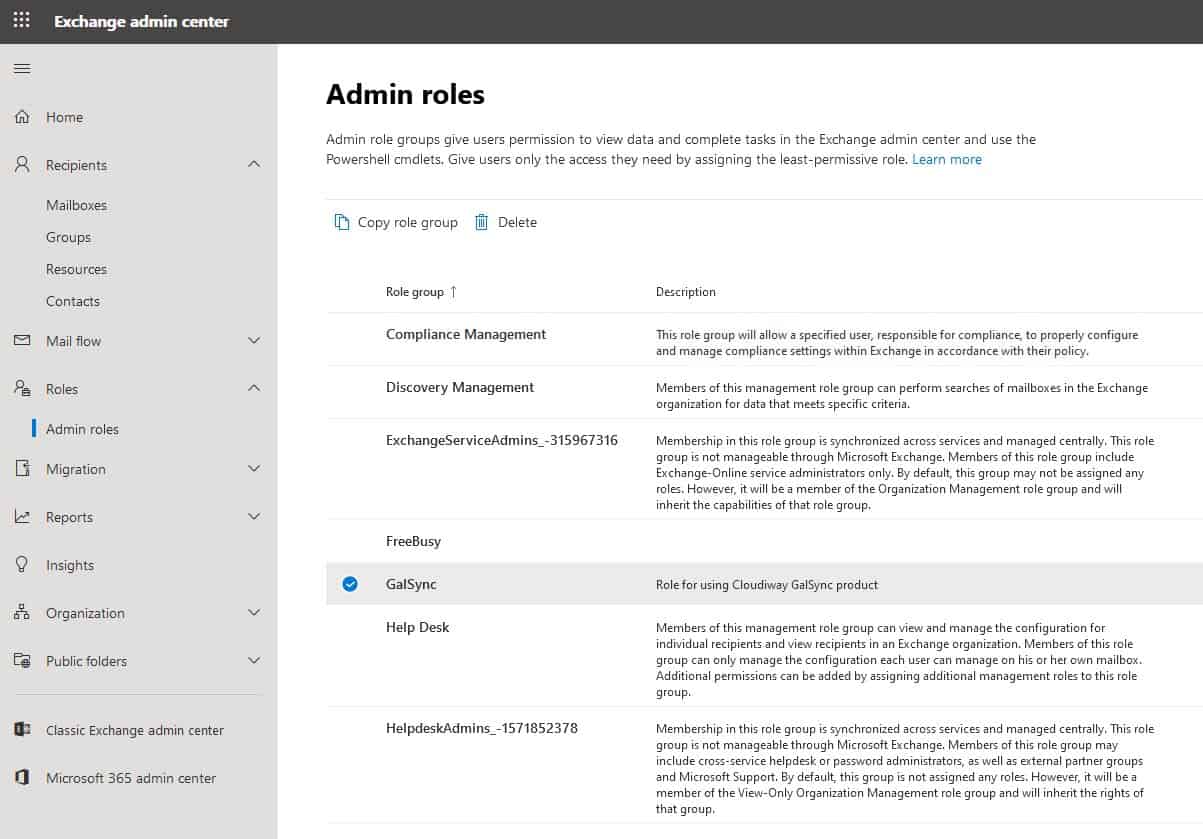
- Give the group a name, description, and set the Write scope to Default
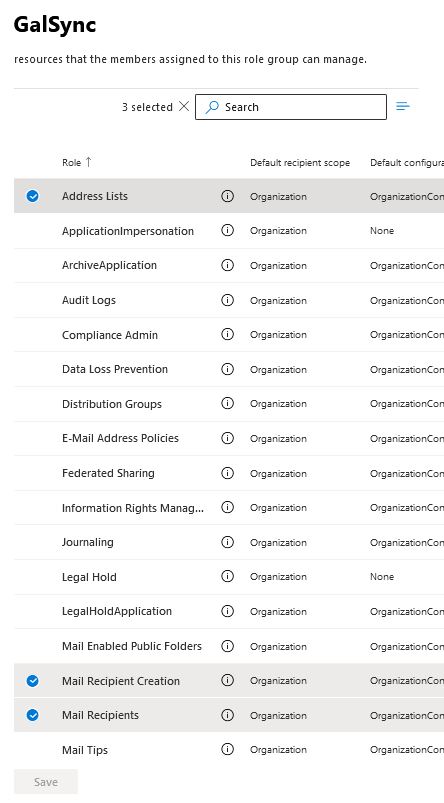
- Assign the following roles to the role group:
- Address Lists
- Mail Recipient Creation
- Mail Recipients
In the Members area, add the licensed service account to the role group.
Click Save
To create your Office 365 connector, check this article.
2.2. Azure Apps Registration
Graph APIs calls are performed through an Azure Active Directory Application which is granted specific permissions.
You can either create an Azure Active Directory Application manually or let the platform create one for you.
If you create the Application manually, you must grant the following permissions:
User.Read.All,
Group.Read.All,
Directory.Read.All
OrgContact.Read.All

To enable the modification of Guest or Mail user:
User.ReadWrite.All

To create items as Guests:
User.Invite.All
Please consult our How To Create Azure Apps Registration page to create the Azure Active Directory Application and associated permissions.
2.3. Google Workspace Service Account
The Google service account needs to be a super admin and requires a valid Google user license.
2.4. Google feeds
From your Google Workspace migration account, give access to your API (Google feeds).
https://apps-apis.google.com/a/feeds/user/,
https://apps-apis.google.com/a/feeds/groups/,
https://apps-apis.google.com/a/feeds/policies/,
https://www.google.com/m8/feeds/,
https://apps-apis.google.com/a/feeds/alias/,
https://www.googleapis.com/auth/admin.directory.user,
https://www.googleapis.com/auth/admin.directory.user.readonly,
https://www.googleapis.com/auth/directory.readonly,
https://www.googleapis.com/auth/contacts
This article explains how to add the Google feeds:
3. Set up Cloudiway for GALSync
The following chapter shows how to setup GalSync between Google Workspace, and Office 365.
Reminder: check out this article to configure GALSync On-Premises Connector.
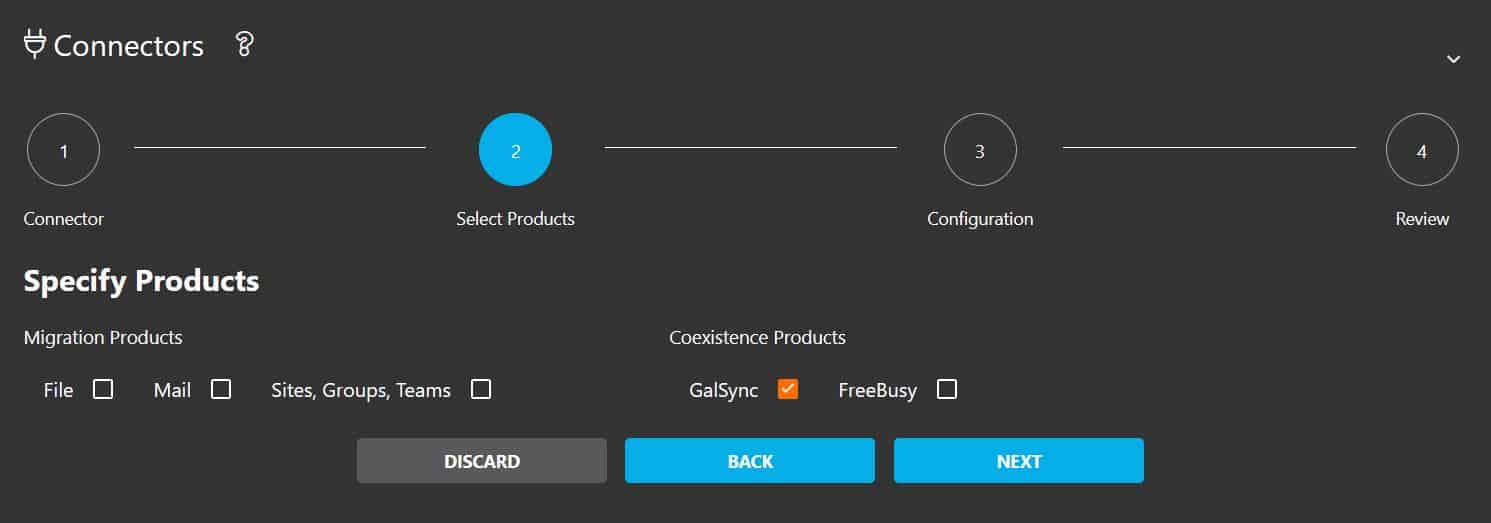
3.1. Create Your Connectors
Connectors are multi-directional. Cloudiway needs to be able to communicate with both your source and target domains. To do this, Cloudiway uses connectors. Please refer to this page to configure your connectors.
When you create both connectors, make sure to select GALSync in Coexistence Products:
3.2. GALSync Configuration
Once your connectors are created, you must configure them for GALSync.
Go to GALSync > Configuration, and select your connector.
Note: Every connector works only for its own configurations (for pull and push). When different configurations (eg. on different groups or users filtered with a mail-enabled security group) are required for the same tenant, different connectors must be created for the same tenant and apply different configurations for each connector.
3.2.1. Pulling Options
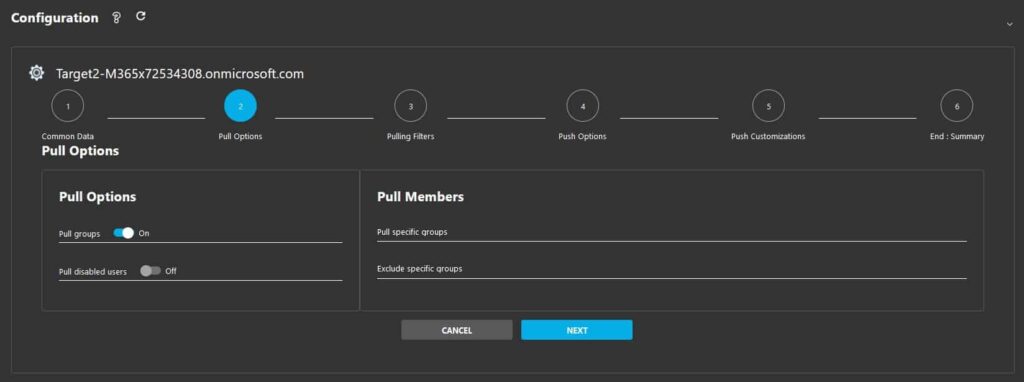
Select if you wish to enable the following options:
Pull Options:
You can apply simple filtering based on a mail-enabled security group.
You need to add the DisplayName of the mail-enabled security group to these 2 sections:
- Pull Groups: whether or not to synchronize groups. Specify the DisplayName of the mail-enabled security group whose member you want to synchronize across.
- Pull Disabled Users: whether or not to synchronize disabled users. Specify the DisplayName of the mail-enabled security group whose member you want to exclude from the synchronization.
Pull Members:
- Pull Specific Groups: synchronize only members of the specified groups. Everything else will be filtered out. This is the recommended way of pulling users and groups from your tenant to avoid pulling service accounts and other users and groups you do not want to pull out of the tenant. Create a dedicated mail-enabled security group and add as members all the users and groups.
- Exclude Specific Groups: synchronize everything except the members of specified groups.
- Important note: The group Display name must be provided and not the e-mail address of the group.
Note: The Cloudiway tools will still pull all objects in the tenant into the list, but will only push the source users and groups based on your filtering rules above. When pulling or filtering by groups, only objects directly added to mail-enabled groups are supported. Nested groups or non-mail-enabled groups are not supported.
3.2.2. Pull Filters
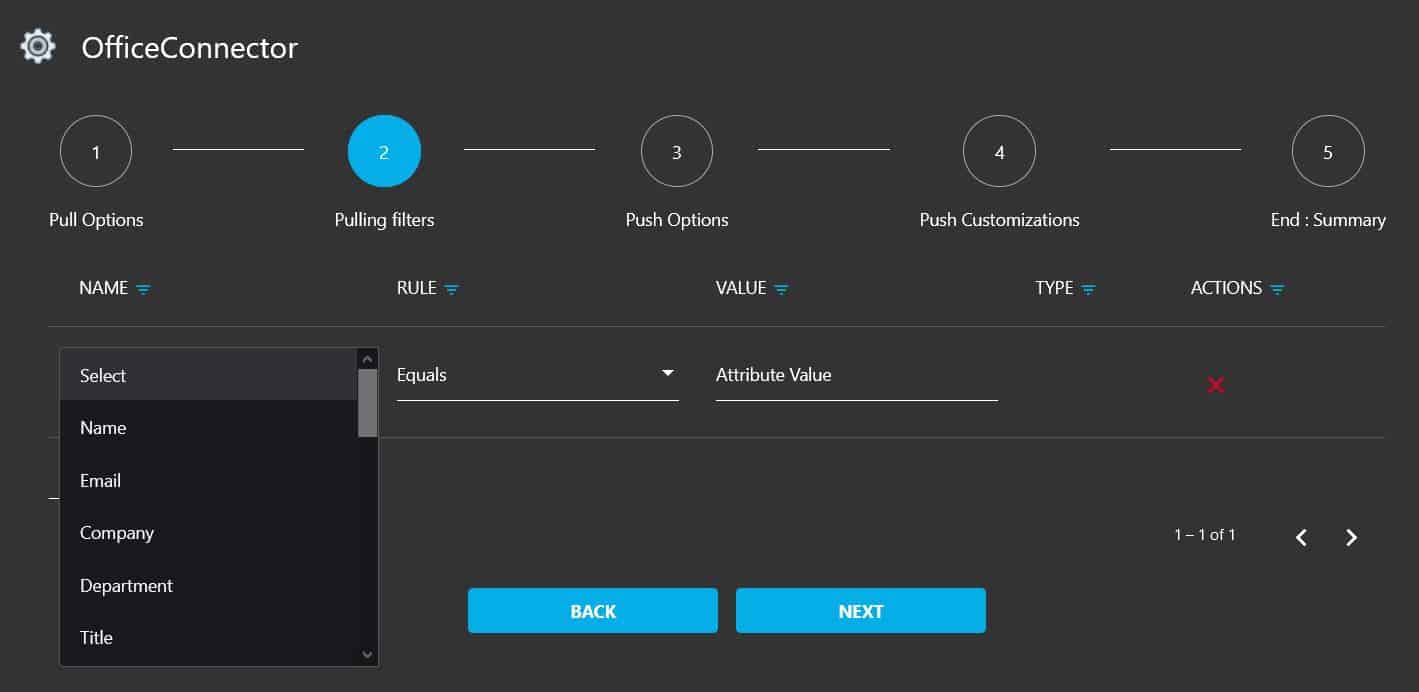
If you don’t want to pull the entire directory, you can specify filters to synchronize only the users and groups of your choice.
Filtering is applied as filter out action, e.g. NAME: Email, RULE: Equals, VALUE: user@domain.com and TYPE: User, will pull all other users, except user with VALUE: user@domain.com. If we apply two filters, they will react between them as there is an AND condition, e.g. user1@domain.com with Rule: DoesNotEqual and user2@domain.com with Rule: Equals, we will have as a result to pull only user1 because of the first and the second filter in combination.
The filters are based on attributes that match conditions:
- Equals
- DoesNotEqual
- Contains
- DoesNotContain
- StartWith
- DoesNotStartWith
- MatchRegex
- DoesNotMatchRegex
- DateAfter
- DateBefore
- EndsWith
- DoesNotEndWith
3.2.3. Push Options
For Office 365, you can define various pushing options:
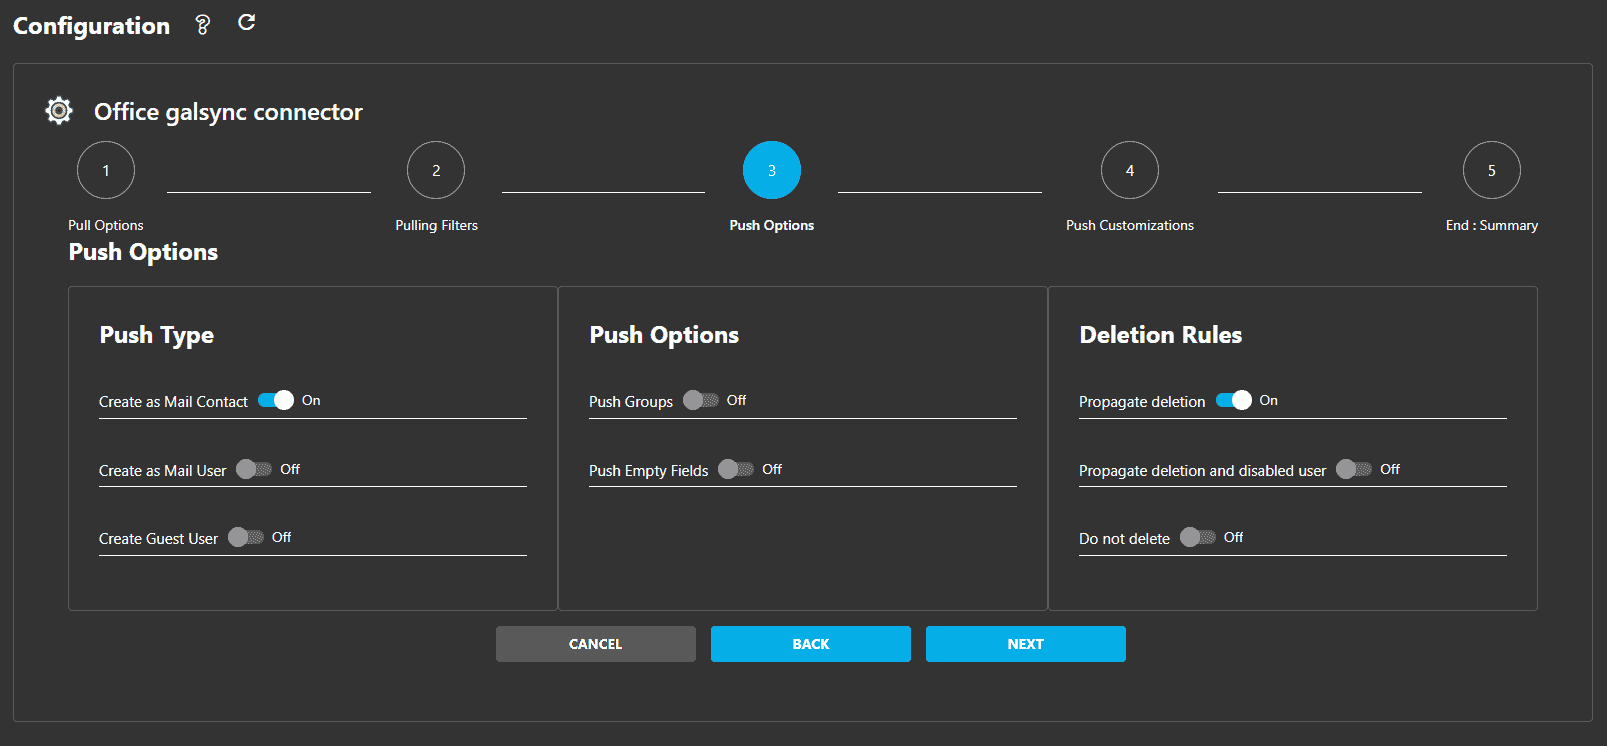
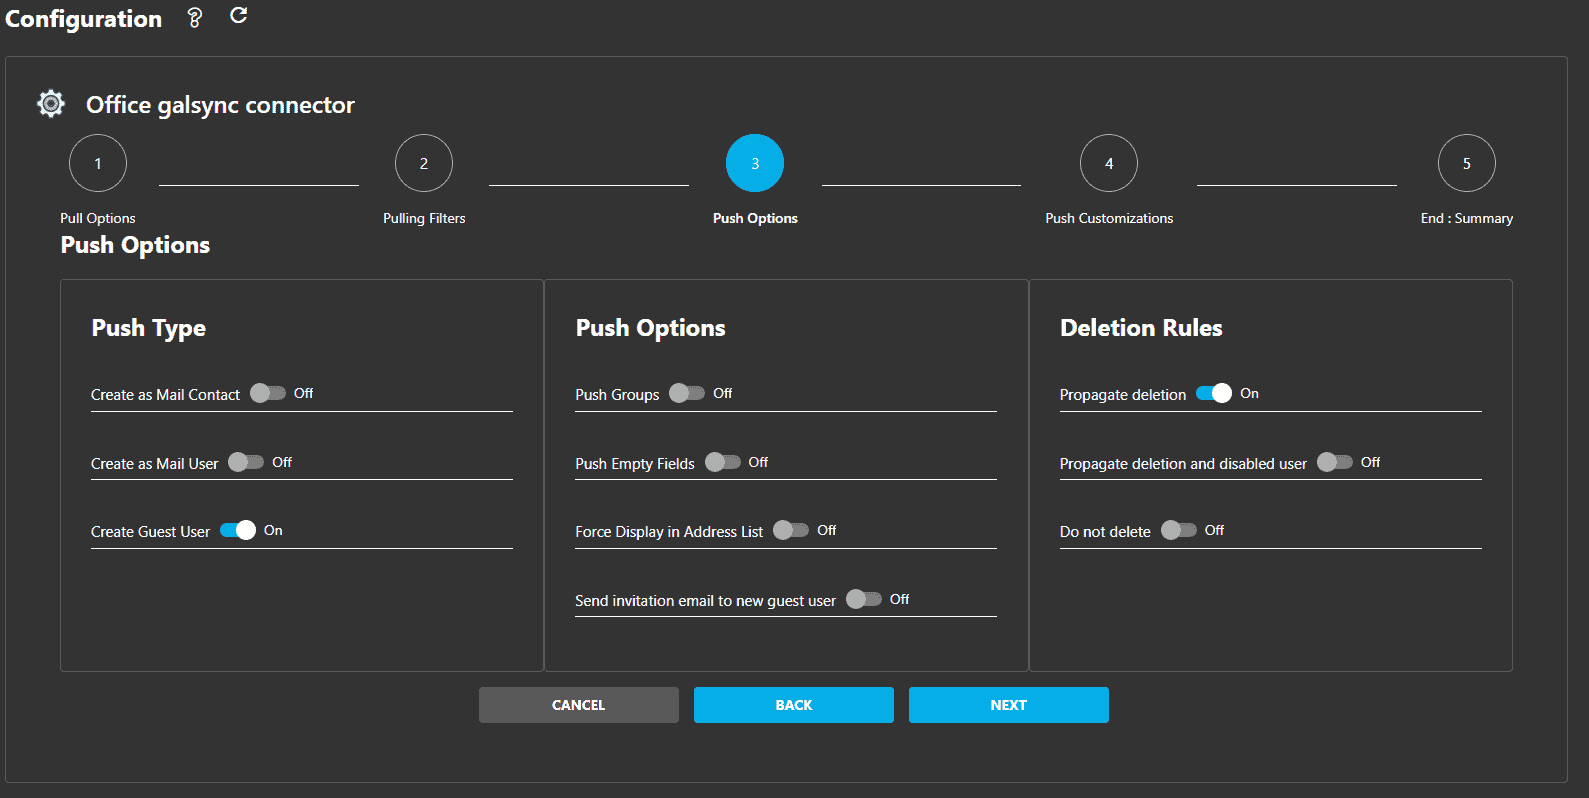
Push Type: source users and groups can be created at the destination as:
- Create as Mail Contact: (activated by default) use this option to only add email addresses in the address book. This option doesn’t allow future migration of the source users to the target tenant.
- Create as Mail User: use this option if you plan to migrate your source users to the target tenant later on (when you are ready to migrate, just add an O365 License to the mail-enabled user).
- Create as Guest User: use this option to allow adding the source users as guest users into the target Microsoft Teams or SharePoint Sites. With this option, source groups won’t be recreated in the target tenant as guest users. When enabling “Create Guest User” you can also enable “Send invitation email to new guest user” and “Force Display Address List”.
Push Options
- Push Groups: enable or disable publications of group email addresses in the address book as Contacts ( or Mail enabled users or Guest users).
- Push Empty Fields: propagate empty fields. If the field is empty at the source but not at the target, the target value will be deleted.
- Force display in address list: used only when creating as target guest users. By default, Office 365 hides guest users from the address book. This option allows for making them visible.
Deletion Rules
- Propagate deletion: when this option is enabled if a user or group is deleted from the source tenant, it will be deleted from the target tenant in the next push. If this option is enabled, the “Do not delete” option will always be disabled.
- Propagate deletion and disabled user: when this option is enabled if a user or group is deleted/disabled from the source tenant, it will be deleted/disabled from the target tenant in the next push.
- Do not delete: when this option is enabled if a user or group is deleted/disabled from the source tenant, it will NOT be deleted/disabled from the target tenant in the next push. If this option is enabled, the “Propagate deletion” option will always be disabled.
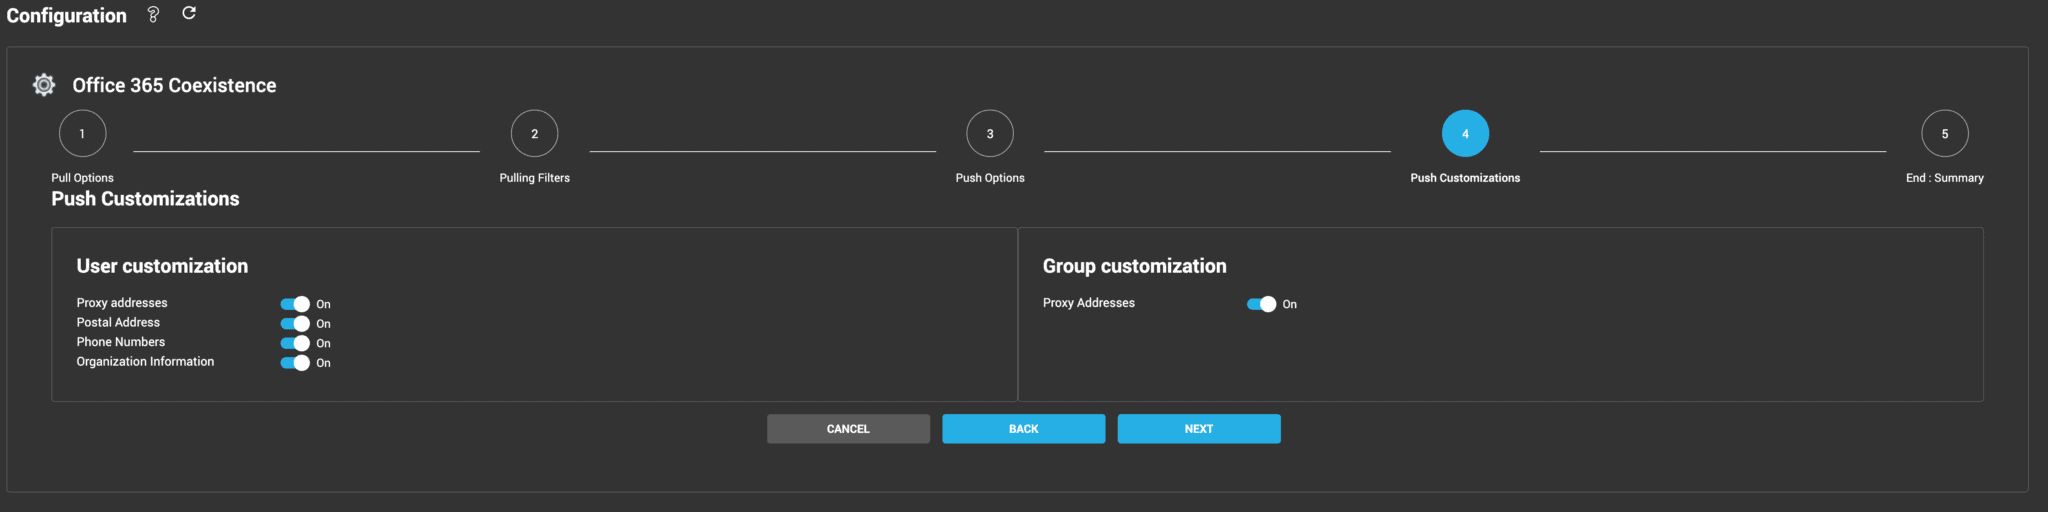
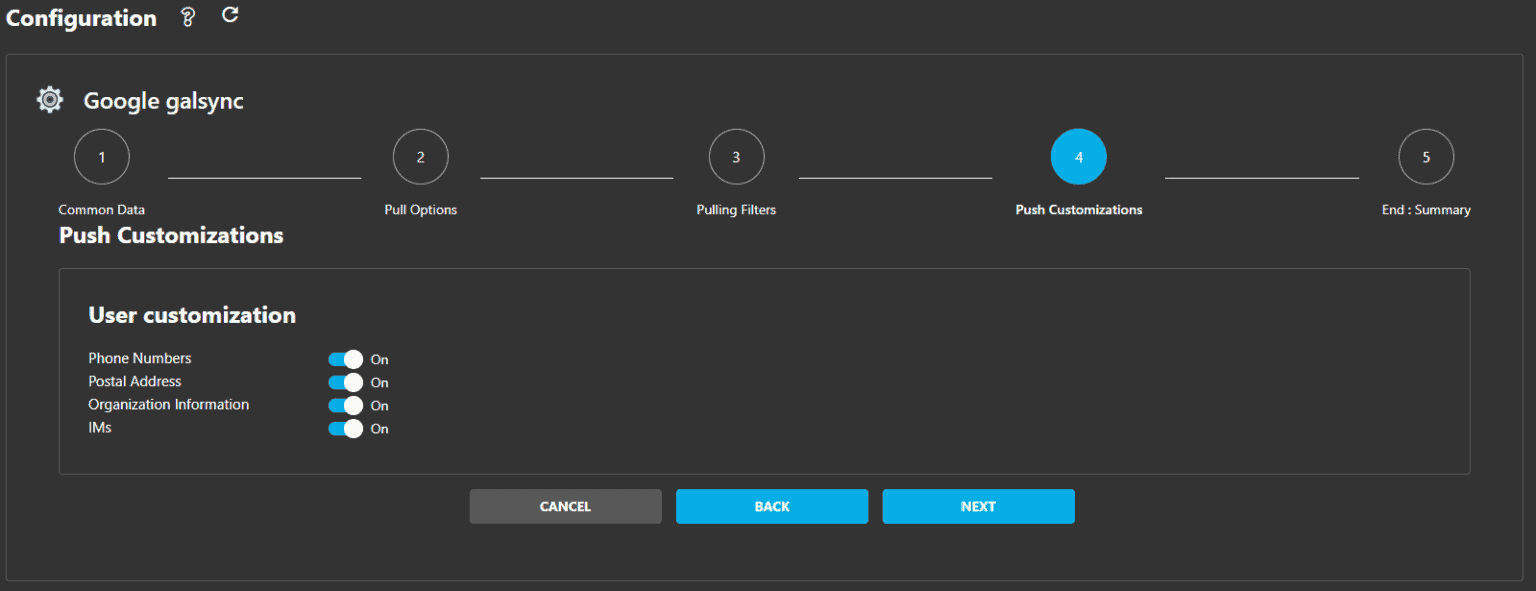
3.2.4. Push Customizations
The Push Customizations allow selecting the attributes to push.
Office 365:
Google Workspace:
4. Synchronization
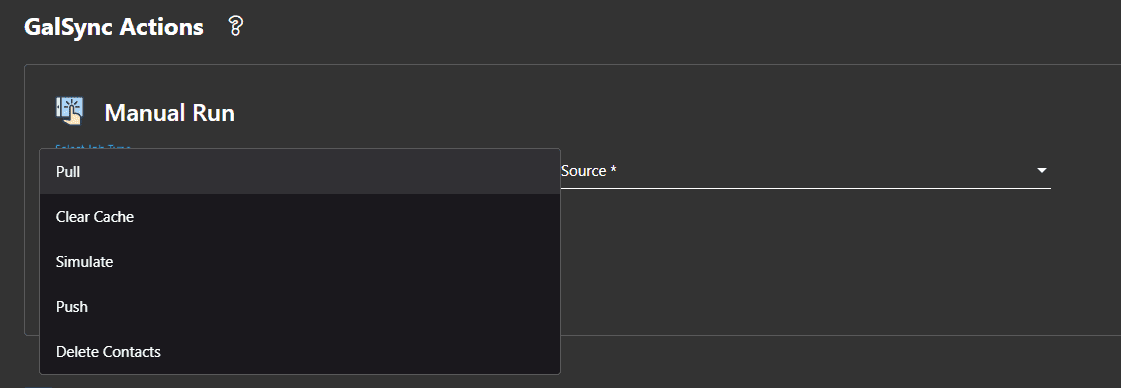
The Actions section allows you to synchronize your users and groups between tenants manually. When your rules are correct, you can automate and schedule the synchronizations.
4.1. Manual Synchronization
This chapter explains how to synchronize your users and groups between a source and a target tenant. This is a two-step synchronization, the first step is to pull the users and groups from the source and then push them to the target.
- Pull: choose both your Source and Target connectors, then click on PULL to pull the users and groups from your tenant. This step will pull (discover) the users and groups on the source tenant.
- Push: this step pushes the users and groups from the selected source to the selected target.
Note: we highly recommend testing this process between two temporary tenants or with fake users and groups before pushing between the final tenants.
List of actions:
- Pull: Use this option to pull the users and groups from the source connector to the Cloudiway internal cache.
- Push: Use this option to push to the target connector all the users and groups previously pulled out of the source connector to the Cloudiway internal cache by the Pull option. It performs different actions: it pulls the objects from the target connector. It then determines what needs to be pushed, and finally pushes the changes to the target. Make sure you Push to target right after getting a Pull from the source, otherwise pushed objects may not be up to date.
- Simulate: Similar to the Push option except that it does not make any changes to the target. You can check the simulation results by clicking on the job (in the History section from the side menu) and then clicking on View Simulation.
- Clear cache: Use this option to empty the Cloudiway internal cache for the selected connector. This action cannot be performed while the action is already been processing.
- Delete contacts: Use this option to delete Google contacts through the Google connector programmatically. A Google administrator cannot manually delete shared contacts.
4.2. Data Discovery
Once a Pull action has successfully completed, you can visualize all the objects pulled out of the source connector. Go to Data Discovery and select the source connector.

All the users, groups and guest users pulled out of the source connector will be displayed below with the corresponding state of the objects compared with the previous synchronization from the source connector to the Cloudiway internal cache:
- Created
- Pending Creation
- Unknown
- Modified
- Pending Modification
- Not Modified
- Programmatically Filtered
- Manually Filtered
- Manually Unfiltered
- Deleted
- Pending Delete
- Error
4.3. Automatic Synchronization
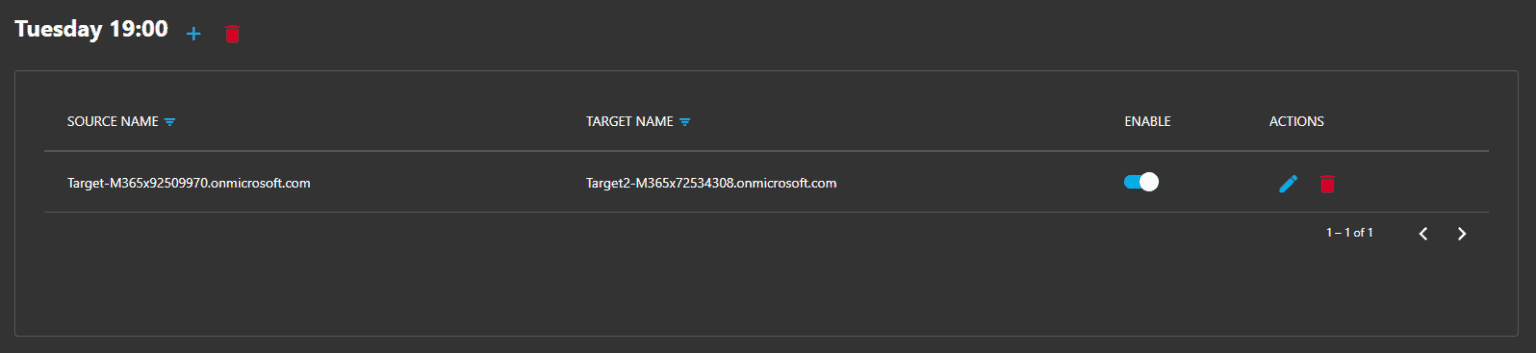
When your rules are correct, you can schedule two actions to automate the bi-directional synchronization from one tenant to the other, in the platform terminology from source to target and then schedule another action in the other direction, from target to source. Each scheduled action will automatically concatenate the Pull action from one tenant to Cloudiway internal cache and once it’s completed, the Push action from the Cloudiway cache to the other tenant, and vice versa for the other scheduled action.
Enable Automatic Run. Select Day of the Week and the Time (UTC) and click on ADD SCHEDULER.

Then click on the “+” icon and select your Source and Target connectors and click on OK. The action will be scheduled to be launched automatically by Cloudiway on the selected day and time.
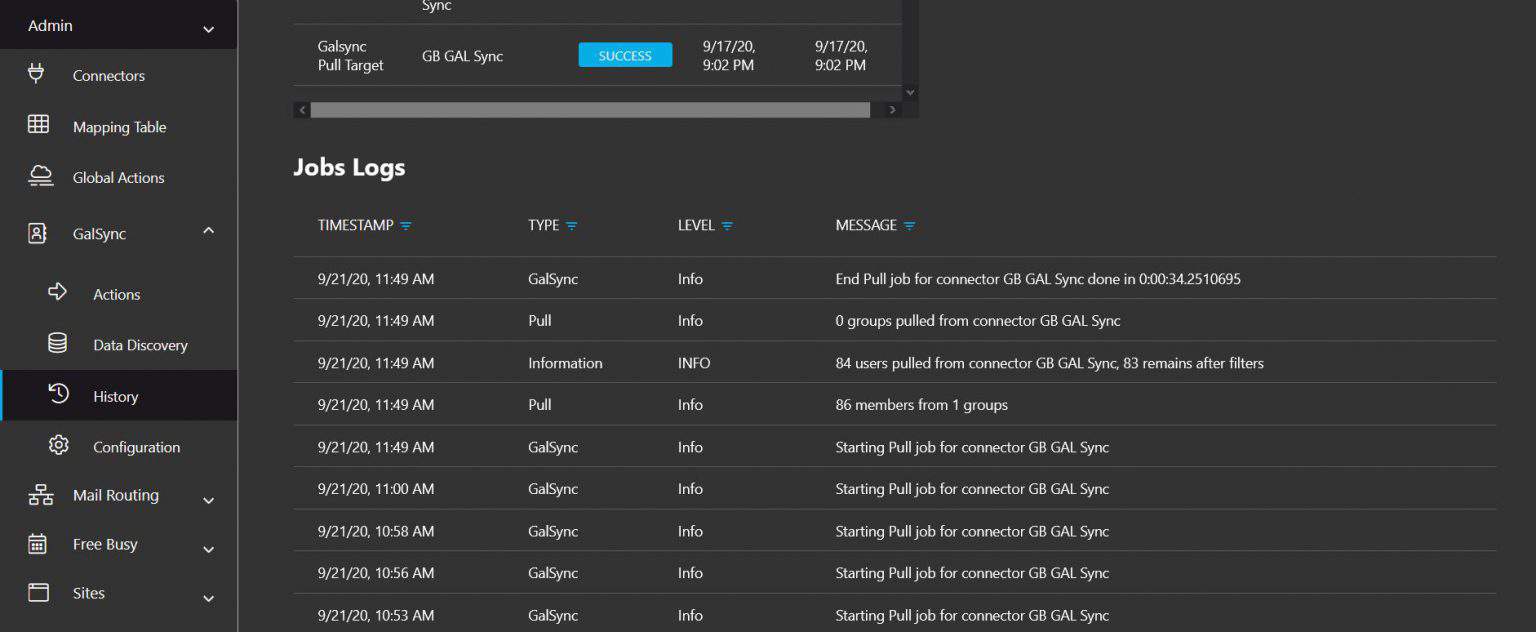
5. History
Switch to the History section to monitor the execution of your tasks, check the status of your jobs, and visualize the results.
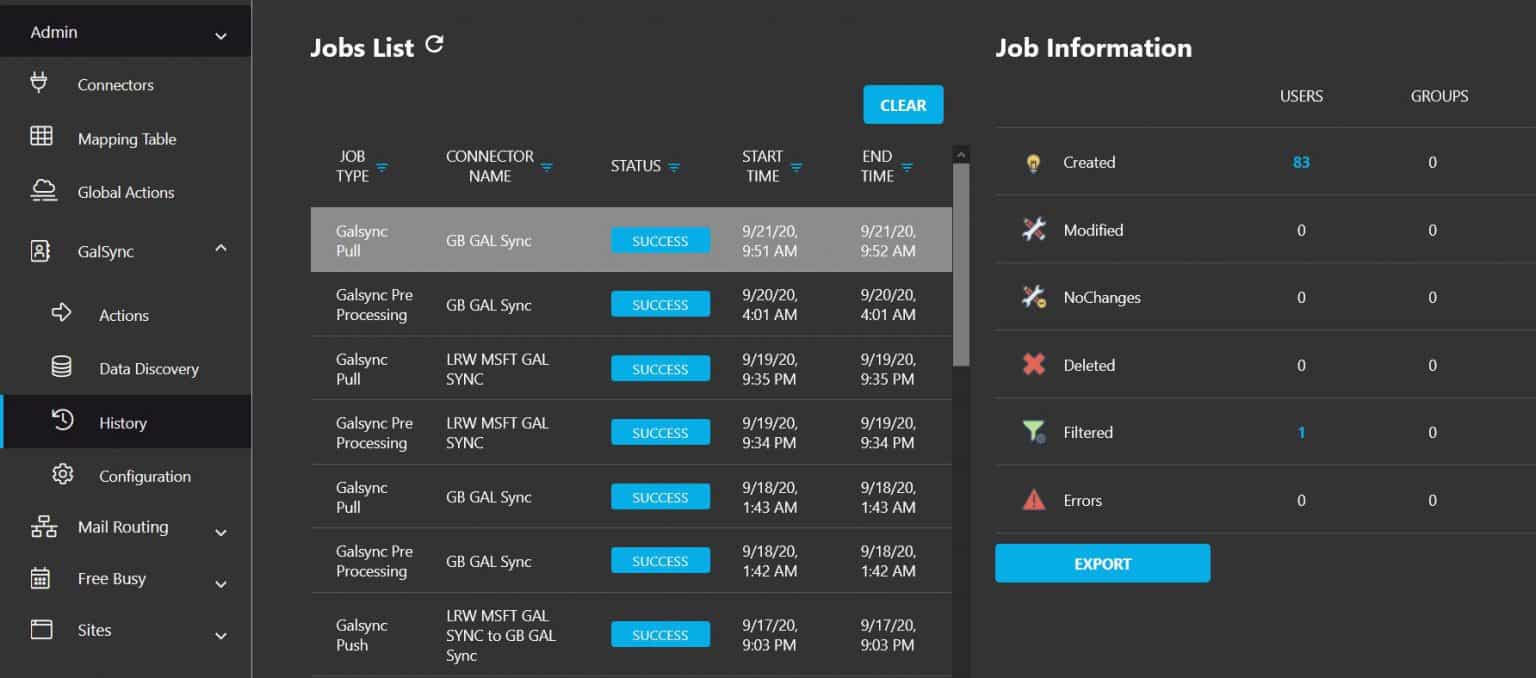
Click on a job to display the results of the synchronization: Creations, Modifications, etc.
Scroll down the page. The Jobs Logs are available under the Jobs List.
6. Troubleshooting
Cloudiway provides an extensive knowledge base with many resources, including common error messages. Please visit the knowledge base here (where you can search for keywords or read through topics).
If you are concerned you might have any difficulty completing these steps, please consider a solution with our consulting team, contact us. This will ensure a fast, cost-effective, and stress-free implementation.