GOOGLE GROUPS MIGRATION Guide
1. Google Groups Migration Overview
Google Groups is a service provided by Google that allows people to create and participate in online discussions and forums. It also enables users to create mailing lists, discussion forums, and other types of online communities. Users can share messages, files, and other types of content with their group, as well as collaborate and work together on projects. Additionally, it provides features such as moderation tools, spam filtering, and customizable email options.
If you are planning to move from Google To Microsoft 365, this guide will show you how and where to migrate your content. Step by step instructions can be found starting in the What is migrated section.
2. Google Groups Migration Introduction
Cloudiway provides an automated migration process that helps organizations quickly and easily move their data from Google Groups to Microsoft 365. Using Google Vault to extract your Google Groups data, we get a complete list of all of your Google Groups along with their content (conversations, attachments, etc). The platform extracts all the content and imports it into the mailbox of the Unified Group or Team, or the Shared Mailbox converted to emails. For additional information about Google Vault, see the Google Vault Help page.
Google Groups to Microsoft 365 migration not only allows you to migrate your content from Google Groups, but to also recreate the groups and membership at the target. This can save you time and reduce your risk of data loss compared to manual migration or other solutions.
3. Google Groups Migration Challenges
Migrating from Google Groups to Microsoft 365 can involve several challenges. Some of the key migration challenges are:
The proper selection of the target: Google and Microsoft 365 work differently, and the word Group means something different to each of them. Where will you transfer your Google group: In a unified Group? In a Shared Mailbox? In a Microsoft 365 team? It’s essential to understand these differences when migrating content to ensure it ends up in the right place.
User Access: The migration process may interrupt the user’s access to their email and other collaborative tools. Messaging from the IT team ahead of time to communicate any changes in the access or functionality of the tools, as well as how long this disruption may last, is key to ensuring a successful, minimally stressful migration.
Permissions and membership: If Google Groups have custom permissions set up for different users and groups, these settings may not translate directly to Microsoft 365. The IT team may need to evaluate and adjust permissions settings and membership for Microsoft 365 to ensure a smooth migration.
Data Loss: Some data may be lost or corrupted during the migration process.
Testing: Before the migration process, thorough testing is necessary to ensure that data is migrated correctly and that all settings and permissions are transferred over correctly.
Migrating from Google Groups to Microsoft 365 can be a complex and time-consuming process that requires careful planning, execution, and monitoring to ensure a successful outcome. It is essential to have a detailed migration plan and a qualified IT team to oversee the process and avoid these challenges.
Understanding the differences between shared mailboxes, Unified groups, and teams.
Shared mailboxes are mailboxes that multiple users can use to read and send an email message. A shared mailbox, like the distribution list, has an email address. But the main difference is that it has physical storage associated with it and messages are stored in the shared mailbox. Therefore, it may be an appropriate target for migrating the content of the Google Group.
Unified groups, also known as Microsoft 365 Groups (formerly Office 365 groups) are used for collaboration between users. They will always have an associated team site, no matter where or how they are created. A Microsoft 365 Group is an object in Azure Active Directory with a list of members and a coupling to related workloads including a SharePoint team site, shared Exchange mailbox, Planner, and OneNote notebook.
When you create a Team, a Microsoft 365 group is created to manage the team’s membership. The group’s related services, such as a SharePoint site, Power BI workspace, etc. are created at the same time. So when creating a Team, you will also create a Microsoft 365 Group in the background which is used by the Team for group membership management. Further, the Team will be provisioned with resources like a document library (SharePoint site), which the Microsoft 365 Groups provide. Additionally, you will have communication services like chat, voice calling, video calling, and meetings.
When you select a shared mailbox as a target, emails stored in the Google Group will be migrated as emails in the shared mailbox.
When you select a Unified group as a target, emails stored in the Google Group will be migrated to the mailbox of the Unified group.
When you select Teams as a target, emails stored in the Google group will be migrated to the mailbox of the Team.
4. Google Groups Migration Performance
When migrating from Google Groups to Microsoft 365, it is important to consider several performance aspects to ensure a successful migration.
Data size: The amount of data being migrated can have an impact on the performance of the migration.
Google API and Microsoft API have built-in throttling mechanisms. Throttling refers to the limiting of the rate of incoming and outgoing requests to the Google and Microsoft 365 servers, designed to maintain the performance and stability of their services. Consequently, they are limiting the number of requests per second, the number of messages that can be read or written by a period of n minutes, etc…
Google Vault: Google Groups messages are extracted from Google using Google Vault APIs. Google Vault sets several usage limits that can impact the overall performance of your migration. These limits include product limits and API request quotas. Cloudiway takes these limits into account and extracts content at the maximum allowed rate. For additional details about the Google Vault limitations, see here:
 Usage limits | Google Vault | Google for Developers
Similarly, it is pushing content to the target at the maximum rate authorized by the Exchange, Teams, and Graph APIs.
5. Benefits
Cloudiway is a cloud-based migration tool that offers a variety of benefits for organizations looking to migrate from Google Groups to Microsoft Teams, including:
Seamless Migration Process: Cloudiway offers a seamless migration process, with an easy-to-use interface that enables organizations to migrate from Google Groups to Microsoft Teams with ease. The tool also offers advanced migration features, such as pre-migration analysis and scheduling, to ensure that the migration process is as smooth and efficient as possible.
Reduced Downtime: Cloudiway enables organizations to migrate data from Google Groups to Microsoft Teams with minimal downtime. This means that organizations can continue to work while the migration is taking place, without any interruptions or delays.
Increased Productivity: With Cloudiway, organizations can quickly and easily migrate data from Google Groups to Microsoft Teams, which can increase productivity and efficiency. This is because employees will have access to all their data in one centralized location, making it easier to collaborate and communicate.
Data Security: Cloudiway ensures that all data is migrated securely and safely, with minimal risk of data loss or corruption. The tool uses advanced encryption and security protocols to protect data during the migration process.
Cost-effective: Cloudiway offers a cost-effective solution for organizations looking to migrate from Google Groups to Microsoft Teams. The tool is affordable and can save organizations time and money compared to manual migration methods.
Scalability: Cloudiway is a scalable solution that organizations of all sizes can use. Whether you are a small business or a large enterprise, the tool can be customized to meet your specific migration needs.
6. Google Groups Migration features
The Cloudiway migration platform provides several essential features that will facilitate your migration. This platform allows you to recreate the groups at the target, match your choices (Shared mailbox, Unified Group, Teams), and migrate the membership accordingly. It also offers sufficient flexibility to let you migrate your groups to the appropriate target.
Feature | Details |
|---|---|
Discovery | The discovery process (Get List) retrieves the list of Google Groups users, and automatically populates your migration list. |
Audit | The Audit will retrieve the number of messages stored in each group and its membership. |
Pre-processing | Pre-Processing will automatically recreate your target objects (shared mailboxes, unified groups, teams) and migrate the membership and permissions. |
Migration | The migration will migrate the messages and preserve most of the metadata. |
Delta Passes | The platform supports delta passes. It means that only data created since the last pass will be remigrated whenever you restart the migration of an already migrated channel. |
Dashboard | The Cloudiway dashboard allows the administrator of the migration to monitor the migration and get an idea of the overall progress of the migration. |
SAAS instance/dedicated instance hosted by Cloudiway or on the customer side | Cloudiway migration is an SAAS platform. For security reasons, you may not want to have your data shared or mixed with other customer data. To address this, Cloudiway proposes 3 ways of working:
|
APIs | Migration can be fully automated through the use of the Cloudiway rest APIs. |
7. Security
We take your privacy and security seriously at Cloudiway, and have invested significant effort into securing our platform and your data.
Cloudiway infrastructure is fully hosted in Microsoft Azure, and leverages Azure Security certifications. We work closely with Microsoft and are fully involved in large migrations managed by Microsoft. As such, Cloudiway passed the Microsoft SSPA (Supplier Security & Privacy Assurance Program) certification ( Supplier Security & Privacy Assurance )
More information about Cloudiway security is available here:  About Cloudiway Security
8. What is migrated
- Groups are recreated at the target as Shared Mailboxes, Unified Groups, or Teams.
Posts and replies are migrated as emails at the target
Membership is migrated
9. Prerequisites
Before you being your migration, there are several key steps that need to be completed first. Make sure that you follow these steps in order, or there may be obstacles when running the migration itself.
9.1. Vault Prerequisites
In order to access the information in Google Groups, you need to have a Google migration account that is authorized to call the Google Vault APIs.
Permissions
The migration account in the connector, either Cloudiway’s Google Service account or a custom Google Service account, should be set up with a Vault role and a valid license for Google Workspace.

The migration account must be a SuperAdmin.
Cloudiway needs permission to access your data through Google APIs in order to access to the appropriate scopes. Follow the steps in this article to ensure that’s set up properly, then return to this guide.
Google Service Account
In the Google connector, you have the option to choose between the Cloudiway Google Service Account and the custom Google service account. For inexperienced users, we recommend choosing Cloudiway’s Google Service account to ensure the settings are correct and avoid unexpected challenges in your migration.

If you are using a custom service account, you will need to enable the Google Vault API. Follow these steps and return to this guide when finished.
Conversation History
As a Google feature, there is an option to enable or disable the Conversation History for a Group. Click Group Settings > Posting policies and make sure the Conversation History is ON.
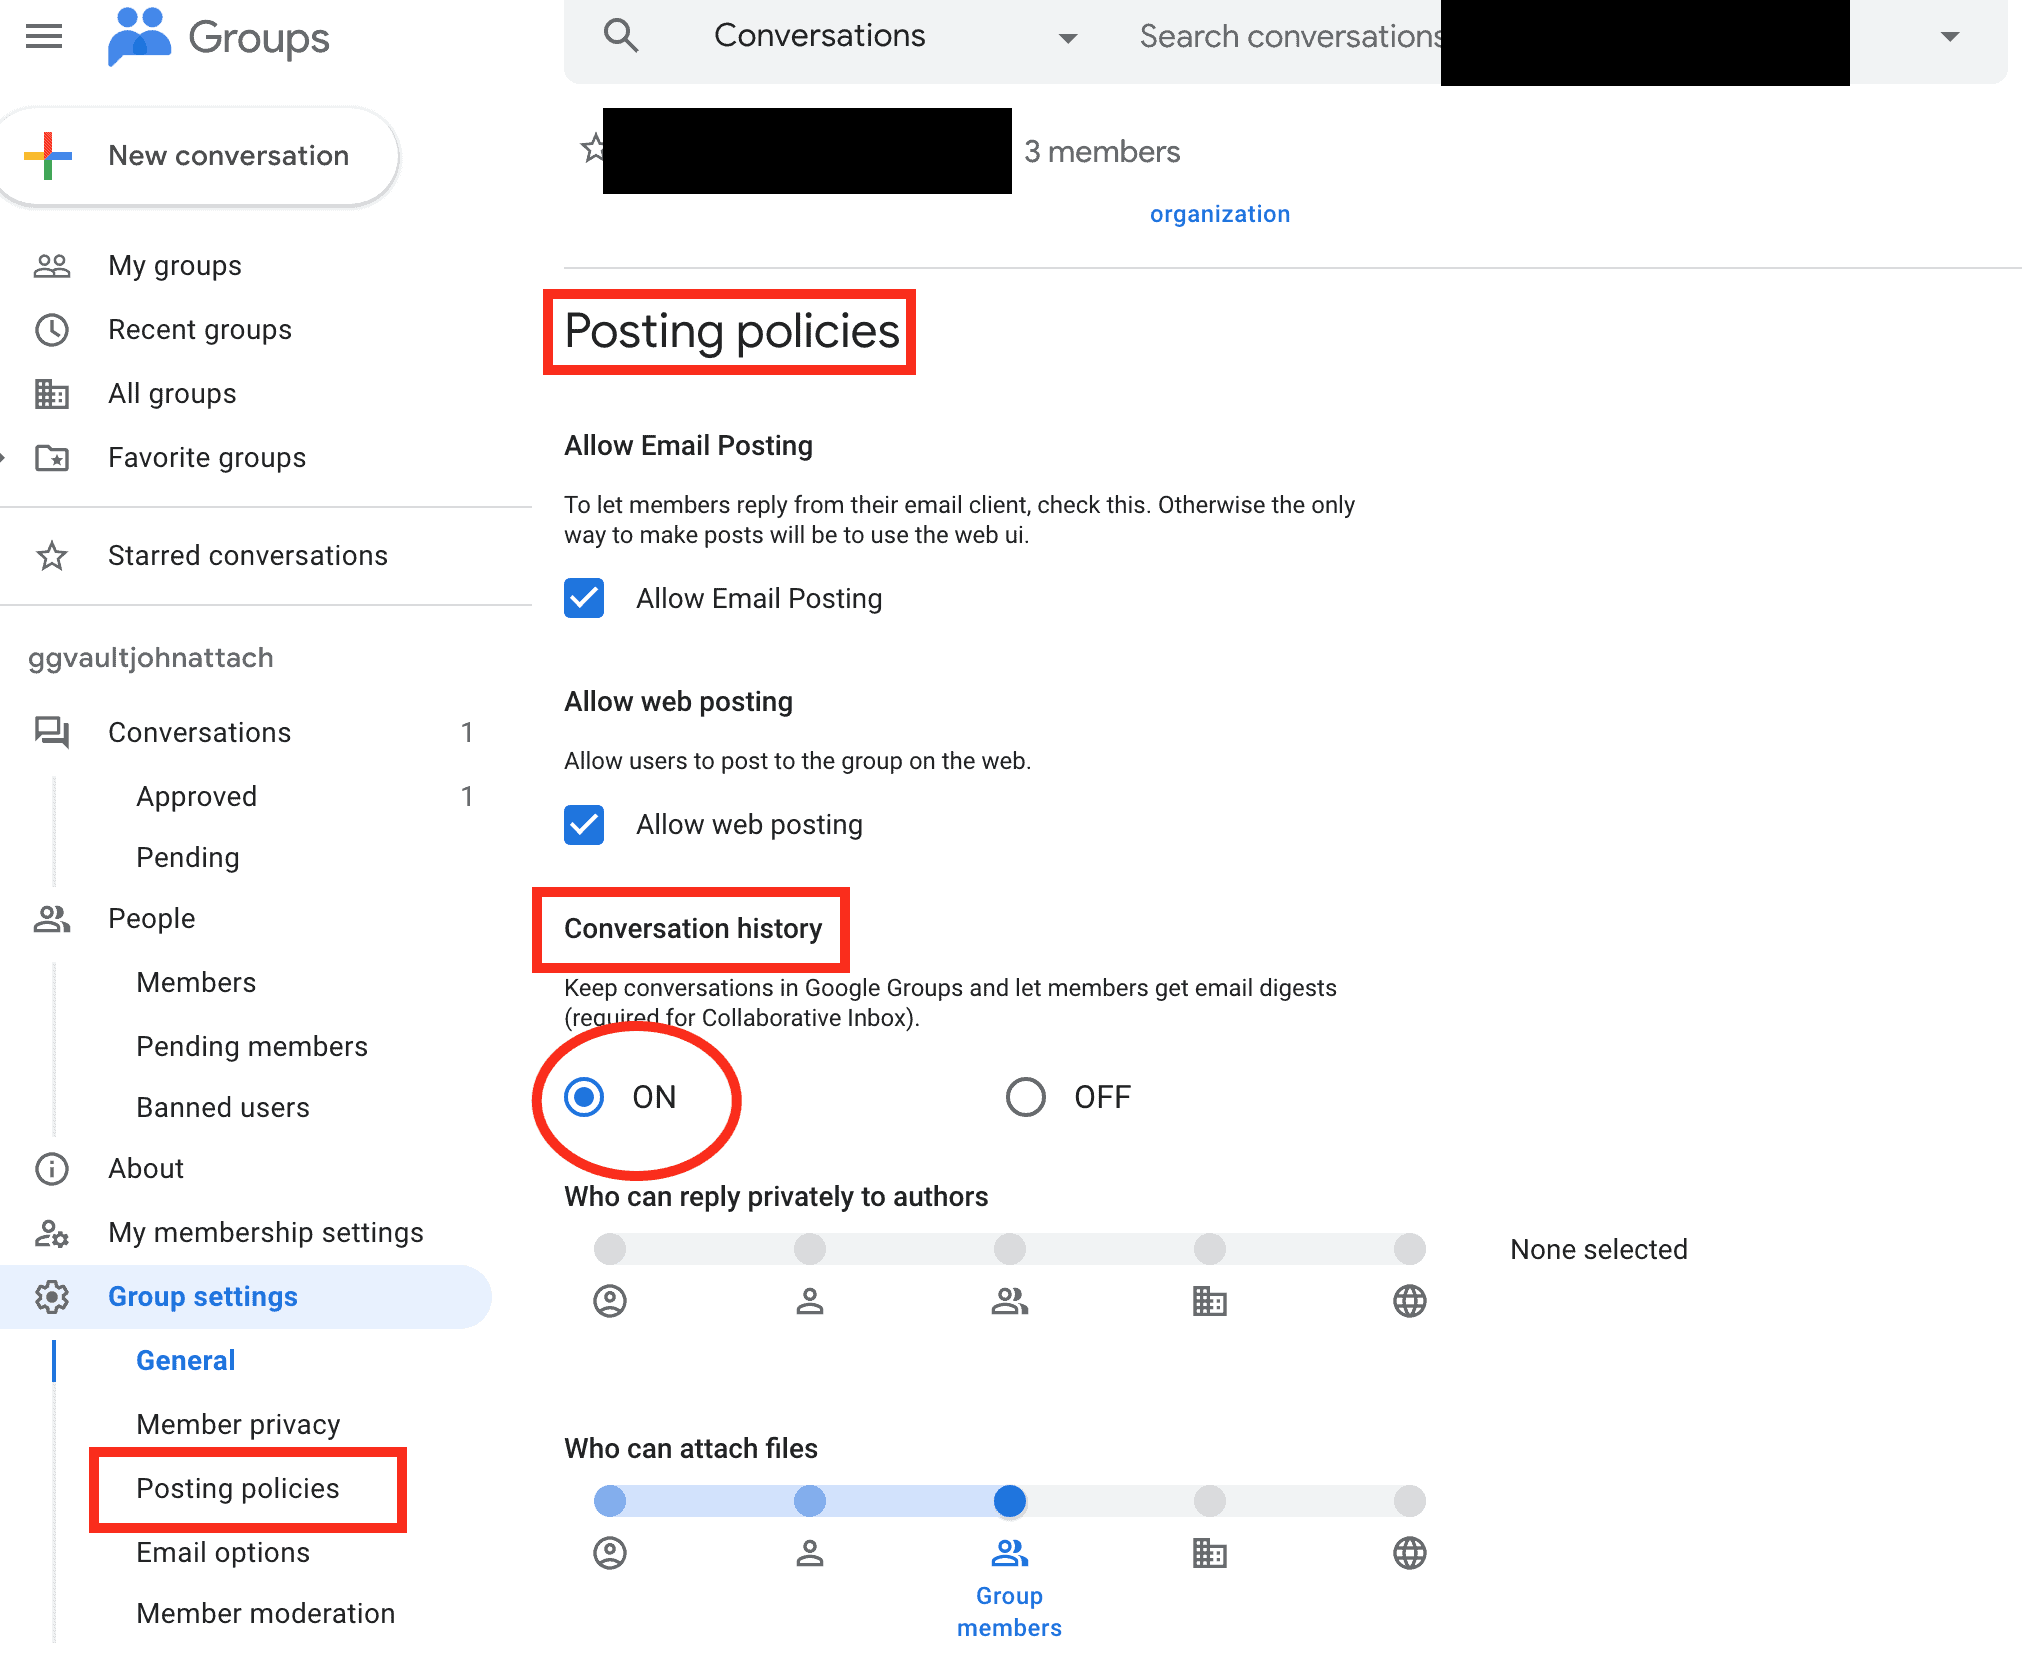
If this option is OFF, new conversations will not be transferred to the Vault, and they will not appear in the Conversations section of the Group.. Any conversation that does not appear in the Conversation section will not be migrated, even after a delta pass. The conversations will only be migrated after a delta pass if they appear in the conversations section of the group before the delta pass.
9.2. Microsoft 365 Prerequisites
Migration uses a mix of Graph APIs, Powershell, and EWS (Exchange Web services) calls, which requires configuring specific permissions to execute these calls. You will need to either create or configure both a dedicated Microsoft 365 migration account, and an Azure Active Directory application.
Dedicated Microsoft 365 migration account:
We recommend creating a dedicated Microsoft 365 account that can be deleted once the migration is completed. Confirm that whatever account you use for the migration, the following settings are in place:
- It must be an Exchange Administrator
- It must not be configured with multi-factored authentication (MFA) or SSO (ADFS)
- The user must have a Microsoft 365 License for accessing exchange.
Azure Active Directory application:
There are two ways to create the Azure AD application, manual or automatic. Administrator credentials are required for the configuration.
For the automatic procedure, select the automatic connector configuration described later in this guide.
For the manual procedure, follow this article.
9.3. Cloudiway Prerequisites
Cloudiway Standard Group Vault migration licenses are required. You will need one Group migration license per source Google Group you want to migrate.
10. Migration Process
The migration is a five step process :
- Create the connectors for connecting to the source and the target .
- Manually create a list of users, run a Discovery (GetList), or upload a CSV of users.
- Run an Audit to fully scope the scale of the migration, including how much data will need to be migrated. This step is optional.
- Run a Pre-Processing to pre-create the target teams and channels and migrate the permissions.
- Run the migration.
10.1 Create your connectors
To facilitate the Google Groups to Microsoft 365 migration, the Cloudiway platform needs to be able to communicate with both your source and target domains. To do this, Cloudiway uses connectors that are set up for each source tenant and each target tenant.
Vault connector
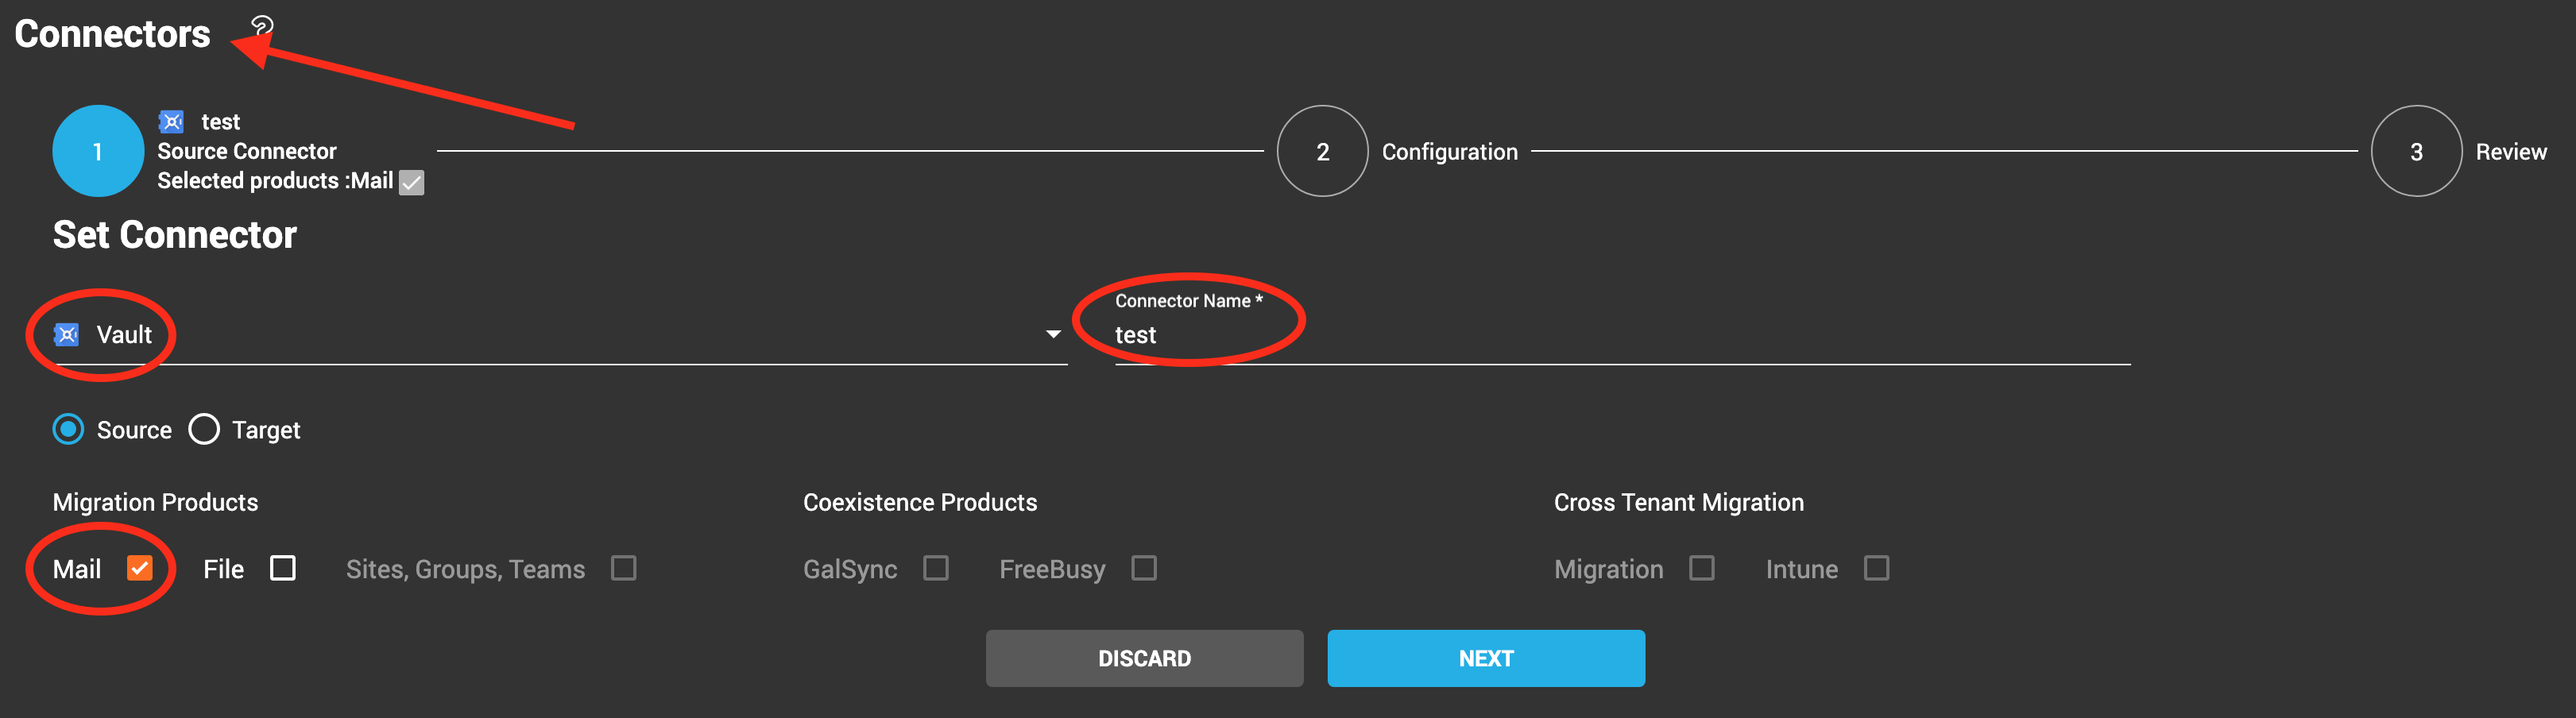
In the menu on the left, go to Connectors and click NEW. Open the Connector Type drop down and select Vault.
Enter a Connector Name, select Source, check Mail as the product, and click Next.
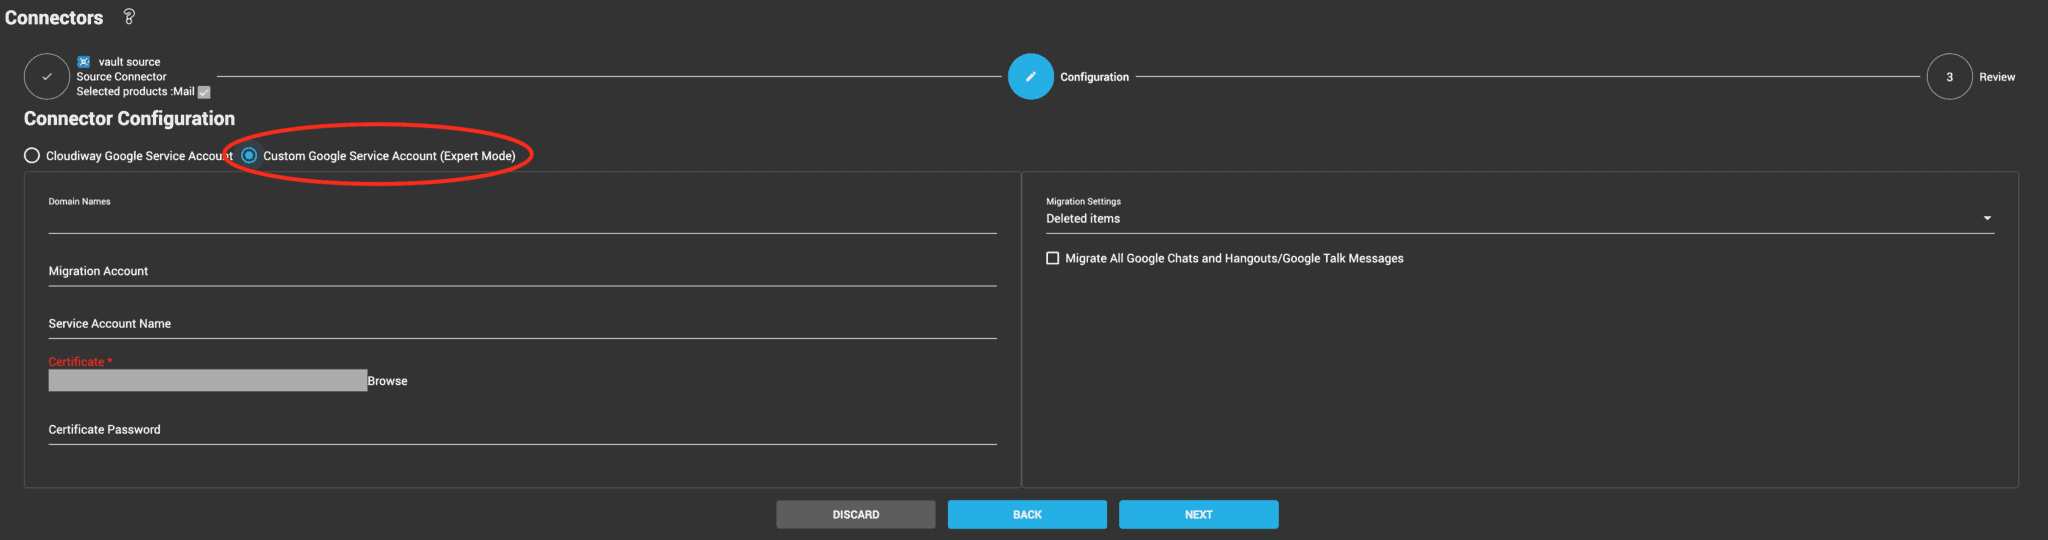
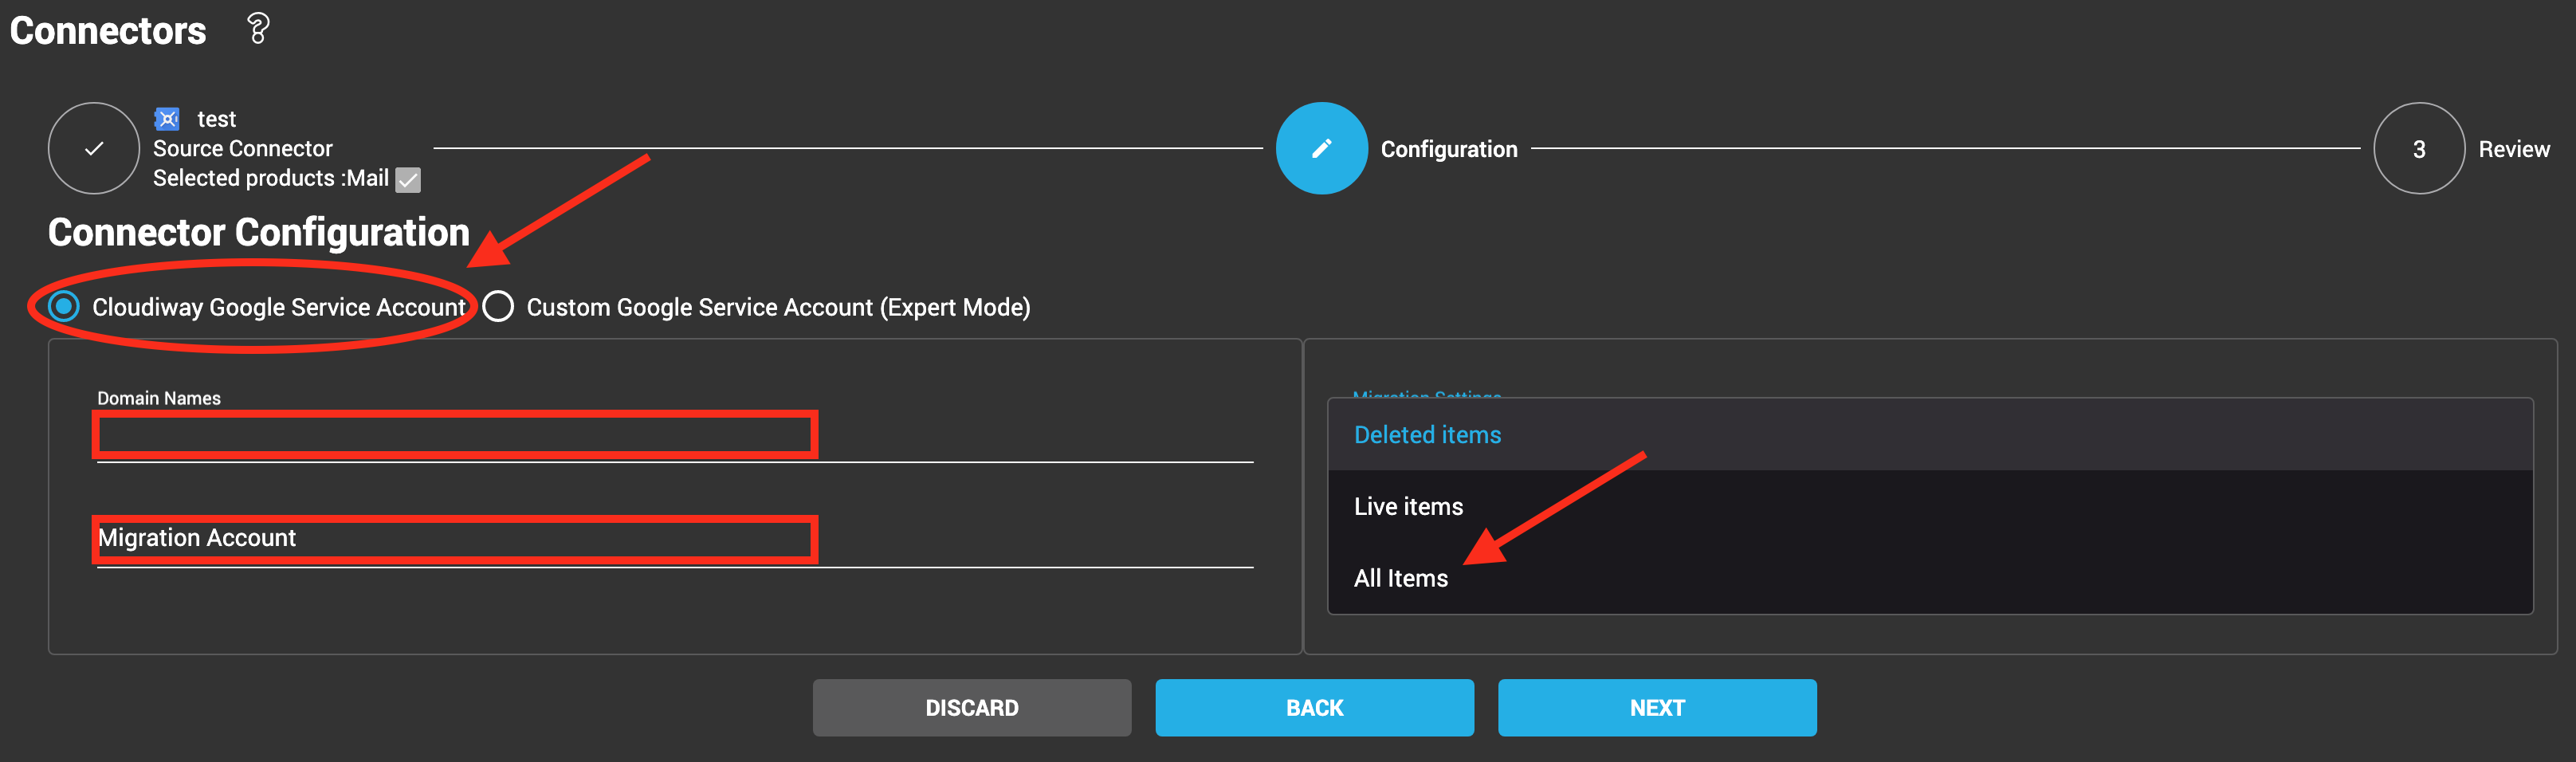
On the next page, you will see the connector configurations where you have two options: Cloudiway’s Google Service Account, or Custom Google Service Account. For more details on the creation of a custom account, click here.
For both options, these fields are required:
Domain Names: enter the domain names to manage.
Migration Account: most of the Google APIs need an account to impersonate. Enter the email address of that account here.
For more information, please read: Do I Need A Global Admin Service Account For Cloudiway?
Under Migration Settings on the right, open the drop down menu and select All Items.
- Migration Account Password: Enter the password of your migration account. Please make sure the password will not change or expire during the project.
- Phone Number and Favorite Login Location are required by Google Site and Google Groups migration. Google may ask to answer security questions if it detects login from an unusual location)
- Google service account: This account is a different account from the migration account specified above.
The Cloudiway Google service account is always the same and its OAuth 2.0 client ID is 114818336788408865729. You don´t need to enter anything in the connector for this option.
The custom Google service account must be created following these steps and the Oauth 2.0 Client ID will be unique to each customer. Enter the service account name, import the certificate and provide the certificate password.
- Click NEXT, then COMPLETE.
Office 365 connector
For instructions on setting up your Office 365 connector, refer to the Office 365 Connector Configuration article.
10.2 Create, GetList, or Import Users
There are three options for creating your list of users involved in the migration. You can manually add the details of each Google Group to the Cloudiway platform, you can run a Discovery to obtain a GetList, or you can upload larger volumes of users through a CSV file.
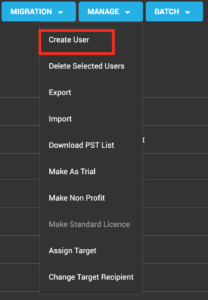
Create Users
Under the Manage tab, select Create User:
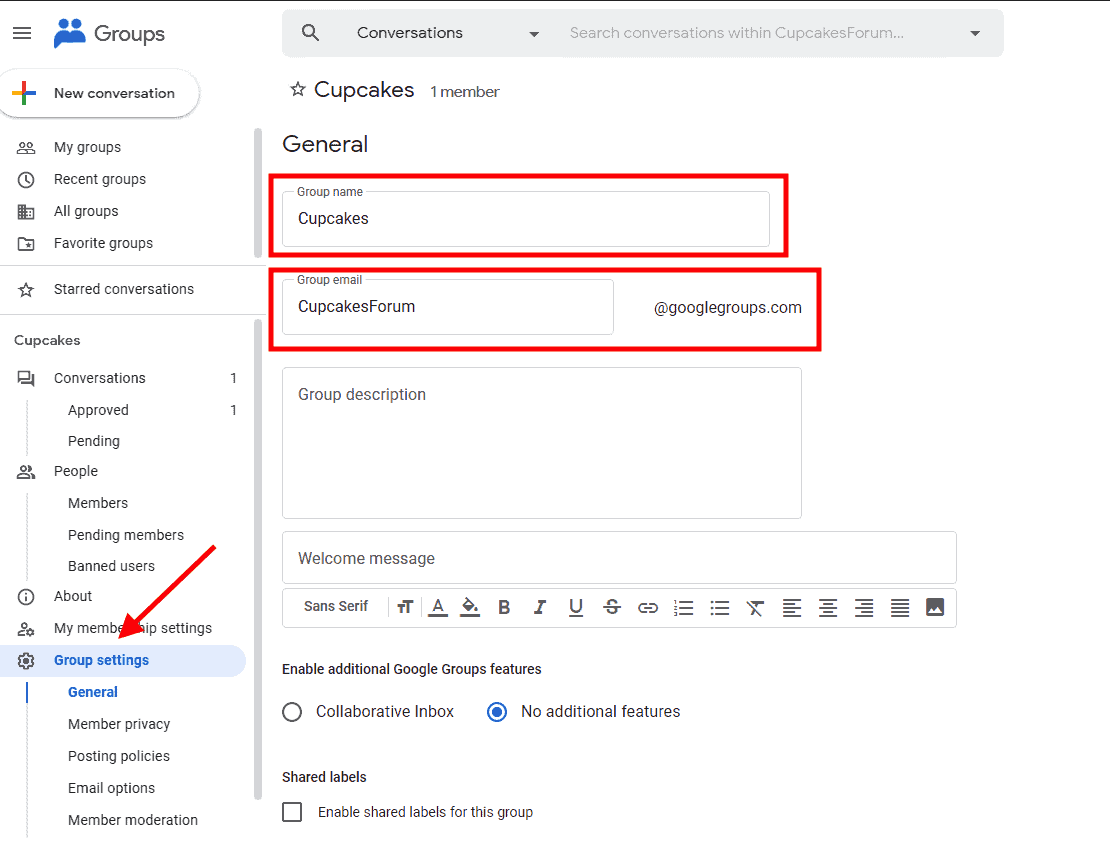
2. Select your source and target connectors and fill in all the mandatory fields. The Group Name and Group Email Address can be found in your Google Groups list.
3. Select your Vault connector as the Source connector, and your Microsoft 365 connector as the Target connector.
Select Google Groups as Source Recipient Type.
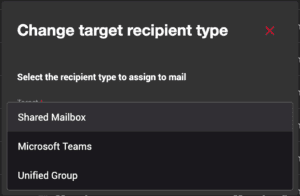
Select the Target Recipient Type.
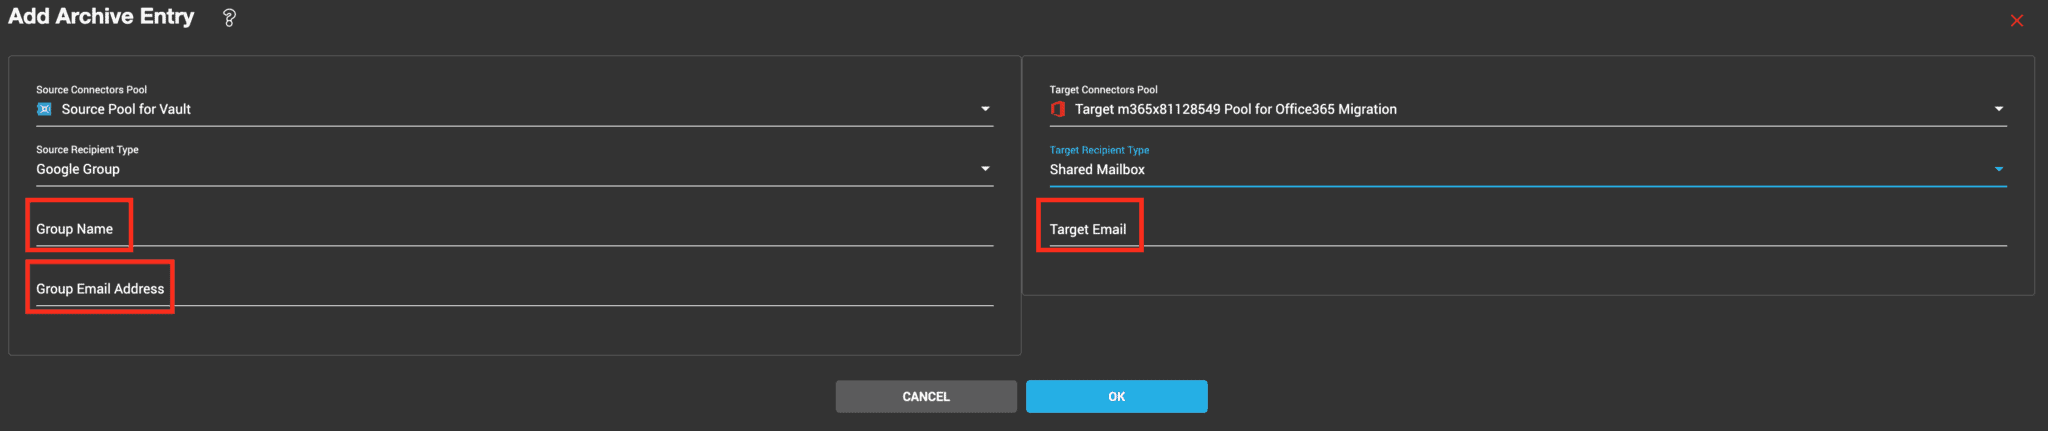
4. Click OK to save the new user.
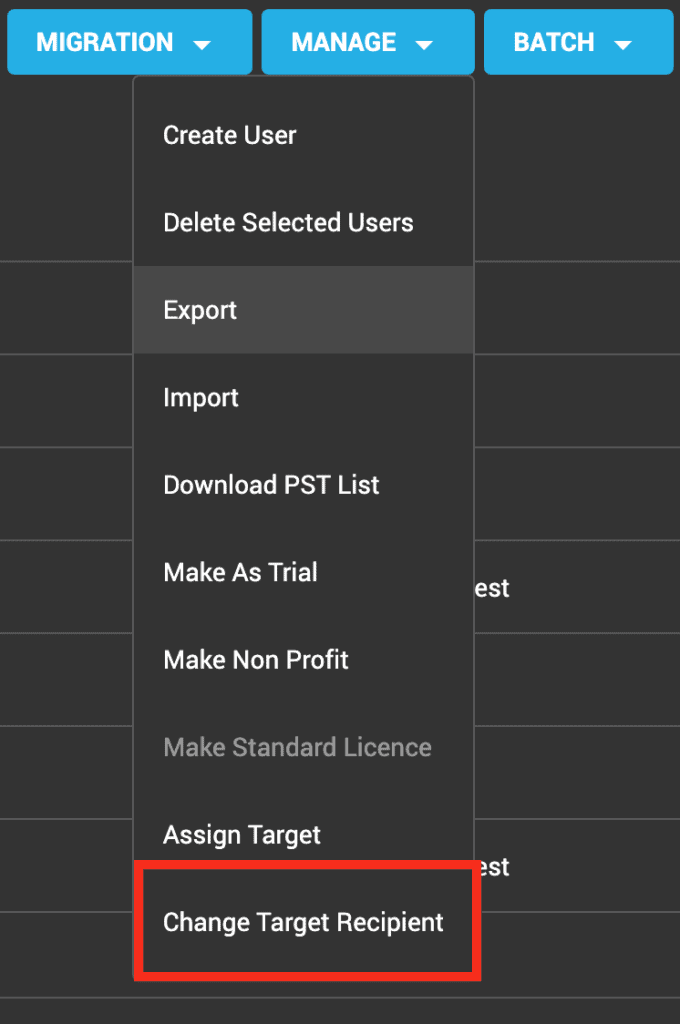
Changing the target recipient type
If you need to change the target recipient type for multiple users, select each one, go to the Manage tab, and click the Change Target Recipient option:
In the pop-up window, select the desired target recipient type you want to assign to all selected users:
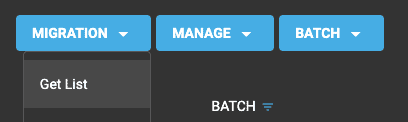
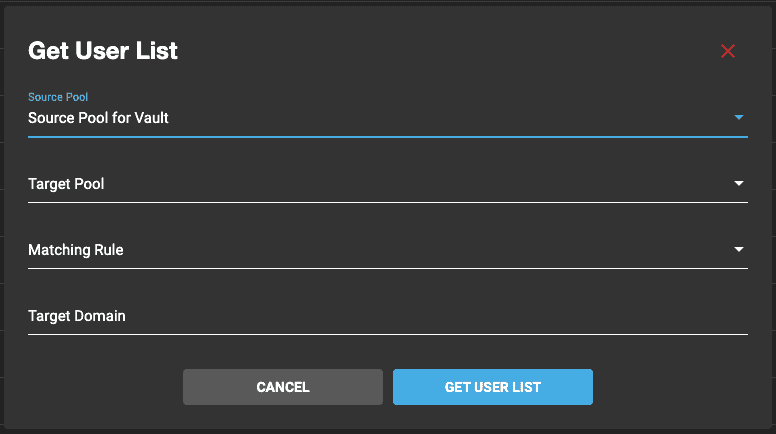
GetList
2. Select your source and target pool connector:
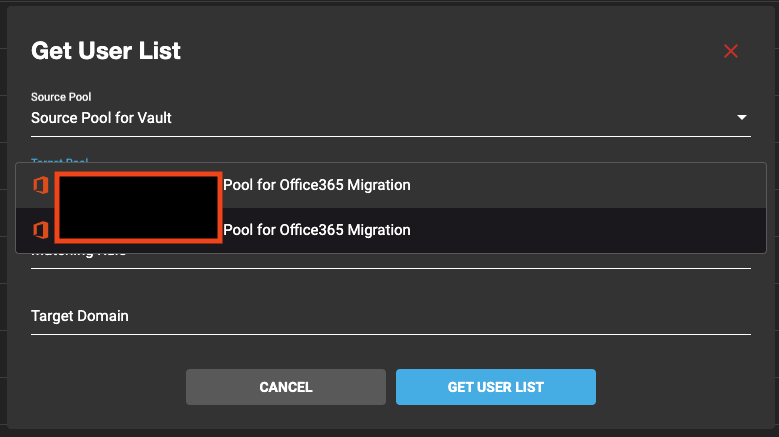
3. After selecting your source Vault connector, a message will appear to inform you that the GetList action will be run for Google Groups:

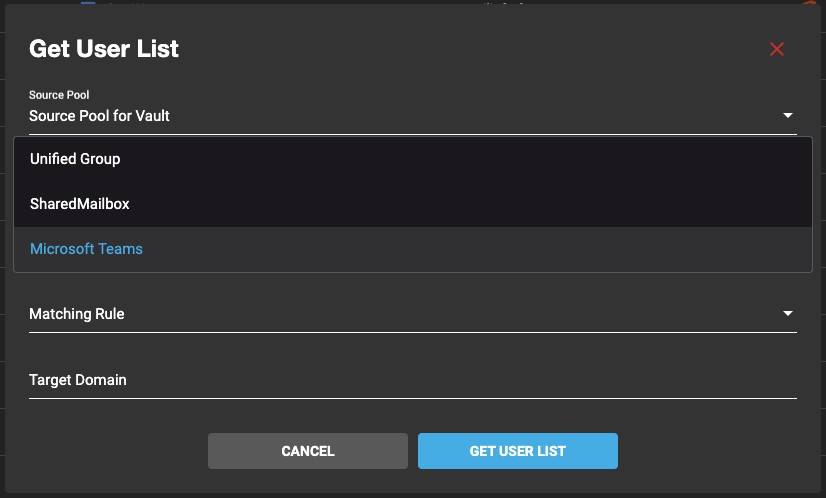
4. Specify the Target Recipient Type, either Unified Groups, Shared Mailboxes, or Microsoft Teams:
Next, specify the matching rules.
Mail Exact Match: the source email and the target email are identical (bob.marley@sourcedomain.com > bob.marley@sourcedomain.com)
Keep Email Prefix Same as Source: only the domain name changed (bob.marley@sourcedomain.com > bob.marley@targetdomain.com)
FirstName.LastName (i.e. bob.marley@targetdomain.com)
F.LastName (i.e. b.marley@targetdomain.com)
FLastName (i.e. bmarley@targetdomain.com)
LastNameF (i.e. marleyb@targetdomain.com)
The Target Domain
Upload Users through CSV file
If you have a CSV file of all of your groups, you can upload the file directly to Cloudiway.
Click MANAGE > Import.
Select the CSV File, the Source, and Target Connectors.
Click Upload.
To edit any data that’s been uploaded, click on the Group from the Group list to display the editable list of fields.
If you perform more than one upload, any duplicated data will not be uploaded.
10.3 Run an Audit
The audit is optional and purely informative. It lets you know how many files and folders you have in the source Google group, and consumes the Cloudiway license. It won’t use any of the licenses you purchased.
Select the Group that you want from the Group List.
Under the MIGRATION tab, click the Audit option:


Your audit results will show the number of topics counted as emails:

10.4 Pre-process
10.5 Migration
Now that you have performed all the pre-migration steps, you’re ready to migrate. We recommend you first run a test migration on a single group to check that your configuration produces the expected outcome.
To start your migration, select the group(s) or batch you wish to migrate.
Click the Start button from the MIGRATION menu.
Your batch will be scheduled and will begin as soon as resources are available. By default, up to 100 migrations can be run concurrently.
The progress of your migration can be found on the main project dashboard.
11. Troubleshooting
Cloudiway provides an extensive knowledge base with information on common error messages, video guides, and downloads.
Please visit the knowledge base here: Cloudiway Help Center – Cloud Migration & Coexistence
Support
Support tickets are opened through the platform, which you can access directly through your project. Click Help, then Support. The chatbot will ask you a couple of questions and then open a support ticket. Once you receive the initial email, you can continue the support there.
More information regarding our support program is available here:  Support – Cloudiway Leader in Migrations and coexistence