
Cross-Tenant Laptop Migration
Complete guide for migrating laptops and devices between Microsoft 365 tenants, including Entra ID joined devices, OneDrive sync, and Outlook profiles.
Overview
This guide shows you how to migrate laptops and devices between Microsoft 365 tenants using Cloudiway's local agent technology.
Video Tutorials
Laptop Migration Overview
Device Migration Deep Dive
Laptop Migration is a feature introduced by Cloudiway that migrates Entra ID Joined and Entra ID Registered devices between two Microsoft 365 tenants. It also supports Hybrid scenarios.
Entra ID Registered Device Migration
Devices remain registered with the source tenant. The migration breaks this connection to allow registration with the target tenant.
Office licenses tied to the source are removed. When users log in with target credentials, Office automatically uses target tenant licenses.
OneDrive Sync Agent stops syncing with the source tenant. Upon next login, OneDrive syncs with the target tenant.
Outlook profile is deleted. A new profile linked to the target mailbox is automatically created when users launch Outlook.
Entra ID Joined Device Migration
The device is unjoined from the source tenant and deregistered from the source Intune tenant.
The Windows profile is migrated, so users log in with target credentials while preserving their existing profile.
The device is automatically joined to the target tenant and registered with the target Intune tenant.
BitLocker encryption keys are backed up into the new tenant to ensure continued data protection.
Entra ID Hybrid Device Migration
The device is unregistered or unjoined from the source tenant.
As administrator, you can then hybrid rejoin the device to the new target tenant.
Looking for our Device Migration Solution?
Discover all features, pricing, and use cases for cross-tenant device migration.
View Solution PageHow It Works
A local agent is installed on each laptop to handle the migration process.
Migration is centrally managed from the Cloudiway administration console, where the administrator can trigger or schedule migrations from the User List.
The local agent periodically connects to the Cloudiway platform and begins the migration once it detects that the scheduled time has arrived. The administrator can choose to start the migration immediately or at a specific date and time.
Local Agent
Lightweight agent installed on each device to handle migration tasks locally.
Central Management
Control all migrations from the Cloudiway administration console.
Scheduled Migration
Schedule migrations for a specific date and time or start immediately.
Silent Operation
Agent runs in the background, silently handling the migration process.
Supported Device Types
Cloudiway supports migration of three types of devices. Each type has specific migration actions and requirements.
Entra ID Registered Devices
For registered devices, the migration performs the following actions:
The agent deletes the registry keys that store information about Entra ID registrations, allowing the device to register with the new target tenant.
Office licenses are reset following Microsoft's documented procedure. When the user logs in with target credentials, Office will automatically use the target tenant licenses.
The OneDrive Sync Agent is reset following Microsoft's procedure. Upon next login, OneDrive will sync with the target tenant.
The Outlook profile is deleted. Users can easily create a new Outlook profile linked to their target mailbox.
Entra ID Joined Devices
For joined devices, the migration performs all registered device actions plus:
Triggers dsregcmd.exe /Leave to unjoin the device from the source tenant.
Unregisters the device from the source Intune tenant.
Windows profile is migrated so the user logs in with target credentials while keeping their existing profile.
Target tenant is joined by installing the provisioning package.
Device is registered to the new Intune tenant.
BitLocker Key is backed up and uploaded to the new tenant. Encrypted devices are fully supported.
Hybrid Entra ID Joined Devices
Hybrid devices are joined to both a local Active Directory and Entra ID. The migration performs:
Unregisters or unjoins the device from the source Entra ID tenant.
Leaves the device joined to the source Active Directory (profile remains untouched).
You, as administrator, configure hybrid join with the new tenant - Cloudiway handles the source unjoin.
Hybrid Join Configuration Requires:
Or Entra Connect Sync to synchronize on-premises AD objects.
Windows 10/11 Pro/Enterprise or Server 2016+ domain-joined to on-premises AD.
Configured in AD for device registration discovery.
For more information, see Microsoft's Hybrid Join documentation.
Prerequisites
Email Addresses vs. UPNs
When populating the Cloudiway migration list, you must use email addresses, not User Principal Names (UPNs).
User Login Requirement
HKEY_CURRENT_USER). This means the user must be logged in for the migration to take place.
You cannot simply reboot the computer and expect the migration to run without a user session.
The local agent is configured to start as a startup task when the user logs in and runs in the background, silently handling the migration process.
Administrator Requirements
The migration of joined devices requires performing several administrative tasks such as:
- Delete Intune registered settings
- Apply a provisioning package to join the target tenant
- Create startup tasks to migrate the profiles
Setup Overview
The steps to configure the laptop migration tool are as follows:
Configure the Permissions
Set up Entra ID applications for source and target tenants.
See Permissions sectionConfigure API Credentials
Create a Personal Access Token for agent authentication.
See API Credentials sectionConfigure Global Settings
Set migration options and upload provisioning package.
See Global Settings sectionDeploy the Agent
Install the local agent on devices via MSI or Click-Once.
See Agent Deployment sectionStep 1 Permissions
Cloudiway uses an Entra ID application to manage device registration between tenants, including unjoining from the source tenant and joining to the target tenant.
You have 2 ways to create the Entra ID Application:
- Automatic: If you create the connector and use the automatic mode, an Entra ID application is automatically created and deployed in your tenant.
- Manual: If you want complete control over what is configured, you can create your application yourself. Follow the How to Create an EntraID Application for Cloudiway guide.
Delegated Permission for Autopilot
One API call (performed at the target) uses delegated mode rather than Application Mode. This is a Microsoft API limitation when setting the owner of the device in the Autopilot List.
- If the service account defined in the target connector is Global Administrator, you don't need extra steps.
- If the service account is not Global Administrator, you need to grant the delegated permission manually.
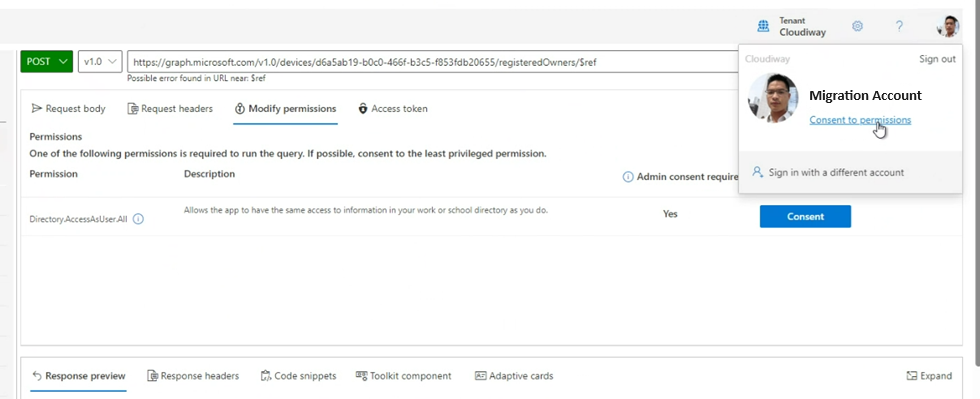
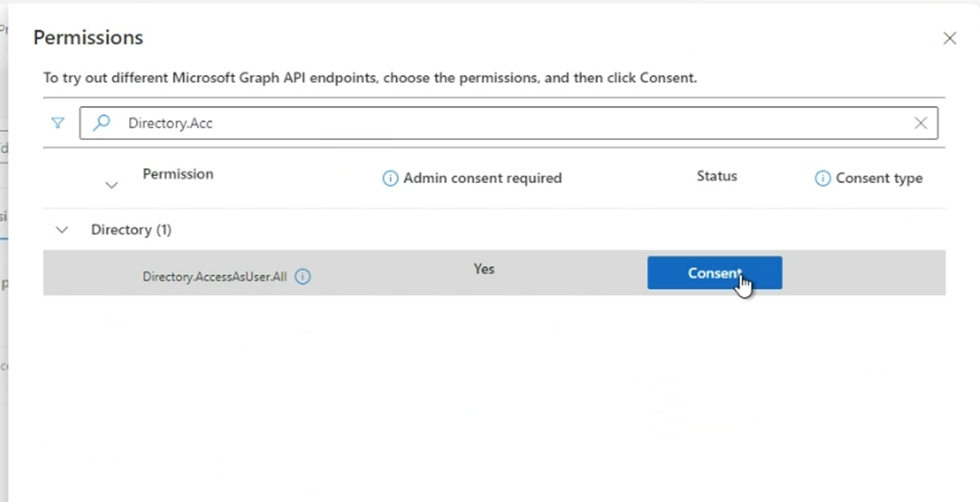
To grant the delegated permission:
- Login to Graph API Explorer at https://developer.microsoft.com/en-us/graph/graph-explorer using the account defined in the target connector.
- Click on Consent to Permission.
- Add Directory.AccessAsUser.All permission.
Step 2 API Credentials
Configure the credentials that will be used by the local agents to connect to the Cloudiway platform.
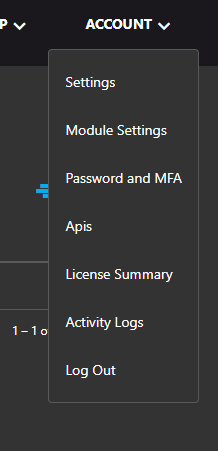
- Login to your primary account and enter your Cloudiway project.
- In the upper right, click on your Account Name, then APIs.
Create Personal Access Token
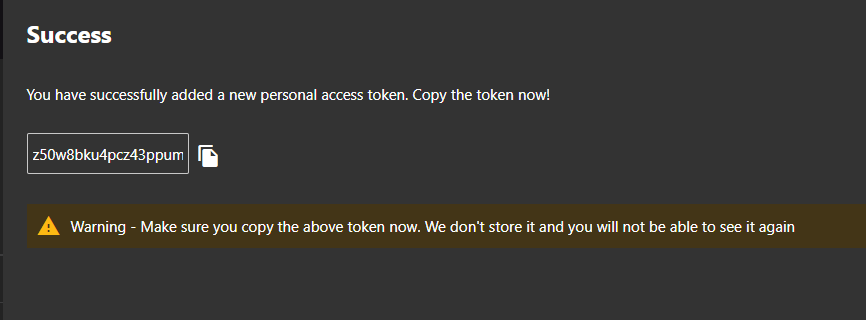
In the Personal Access Token section, click on New Token and create a Personal Access Token. This will be the credentials used by the local agents to authenticate to Cloudiway.
- Give it a name (for example "Laptop Migration")
- Select your project
- Give it an expiration date
- Enable Agent Tenant Migration
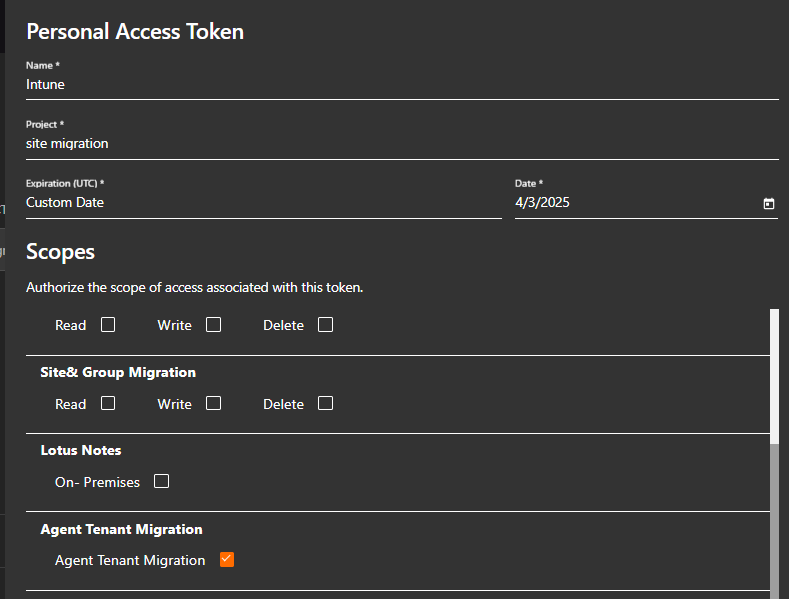
Click on Create and store the personal access token value for later use.
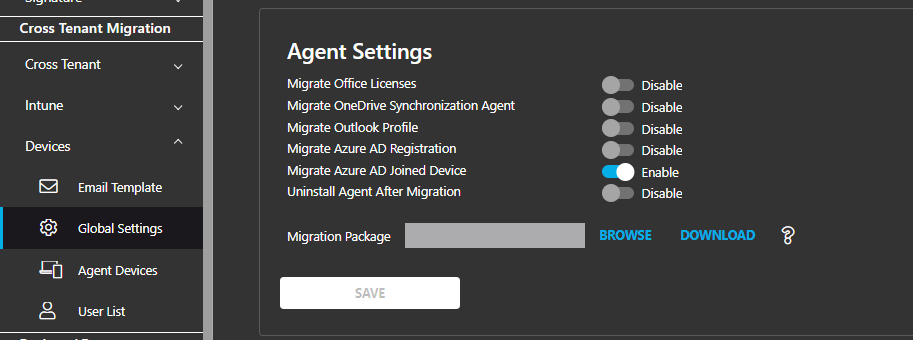
Step 3 Global Settings
Navigate to Cross Tenant Migration / Local Agent.
Click on Global Settings.

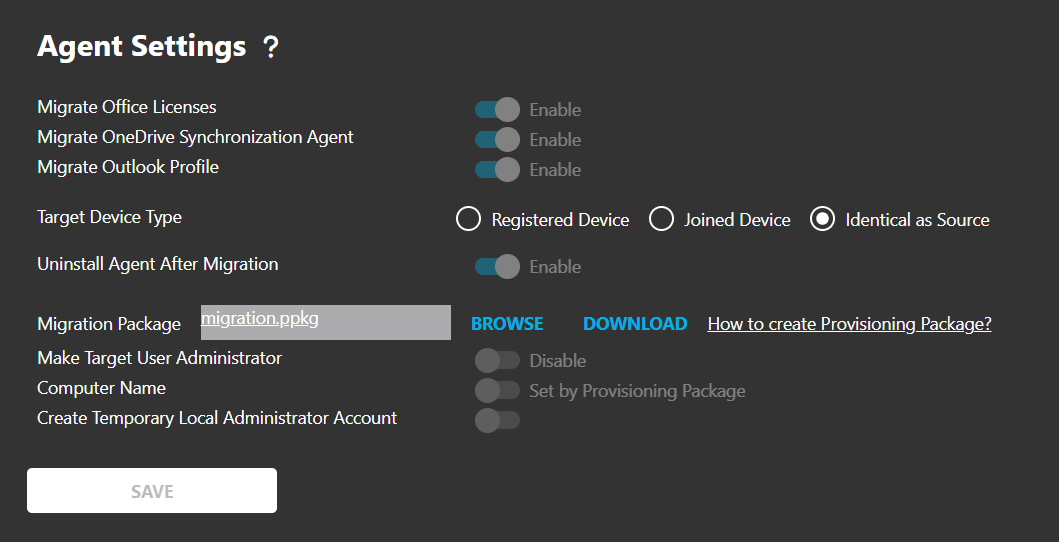
| Setting | Description |
|---|---|
| Company Key | Automatically generated by the platform. Your unique identifier that agents will use to lookup their configuration. |
| Personal Access Token | Reference the Personal Access Token you created in the previous step. |
| Agent Version | Enable or disable Automatic Upgrade. Useful if you want to stay with a validated version throughout the project. |
| Migrate Office Licenses | Enable or disable migration of Office Licenses between the 2 tenants. |
| Migrate OneDrive Sync Agent | Enable or disable the reconfiguration of the OneDrive Synchronization agent. |
| Migrate Outlook Profile | Enable or disable migration of the Outlook Profile. |
| Target Device Type | Choose: Force as Registered Device, Force as Joined Device, or Same as Source. |
| Uninstall Agent After Migration | Force uninstallation of agent after migration completes. |
| Migration Package | Upload the provisioning package for joining the target tenant automatically. |
| Make Target User Administrator | Add the target (new) user as administrator of their device. |
| Computer Name | By default, the provisioning package sets a random computer name. Activate this option to force the computer name to remain unchanged. |
| Create Temporary Local Admin | Creates a local administrator account named CloudiwayMigration and deletes it when migration is completed. Highly recommended for recovery scenarios. |
| DNS Settings | DNS configuration for the migration. This setting must be requested from the Cloudiway consultant assigned to your project. |
Step 4 User List
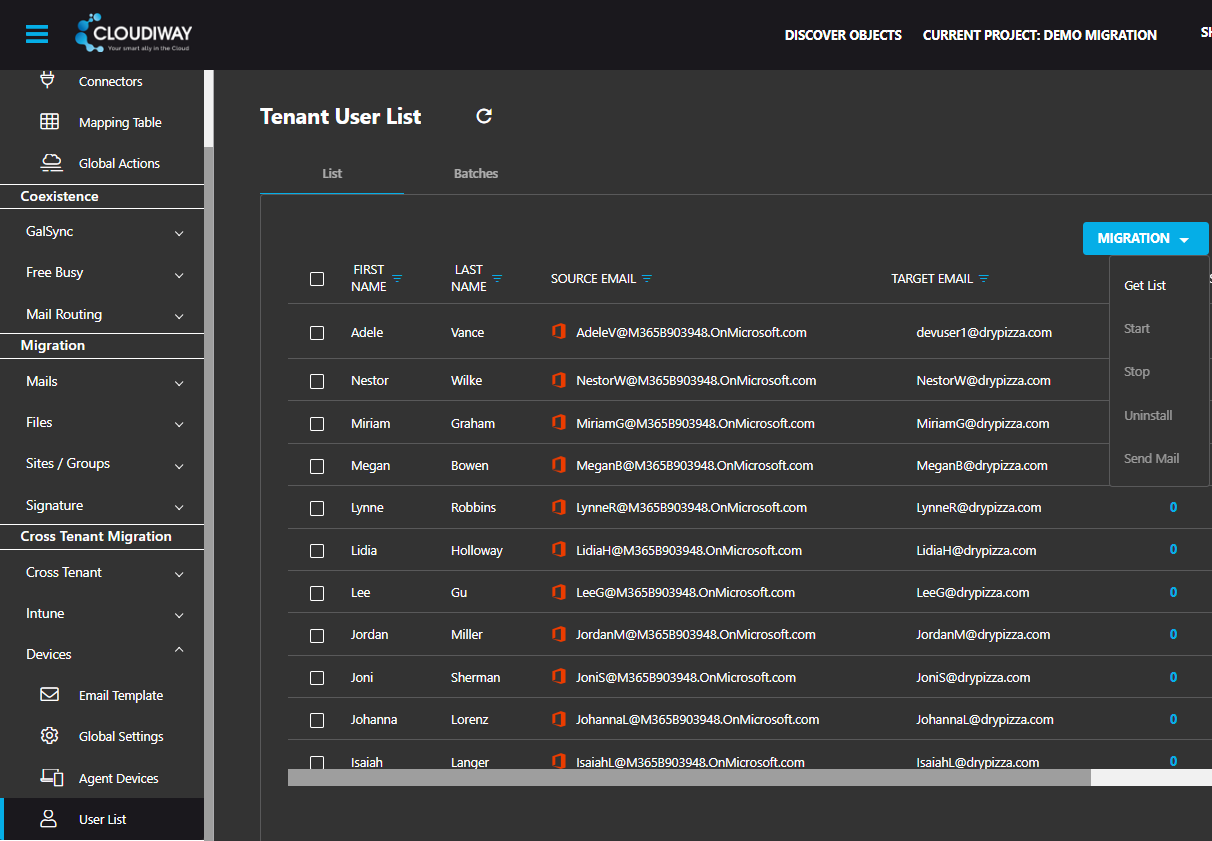
Navigate to Cross Tenant Migration / Devices / User List.
From the Menu, click on Migration / Get List.
This will discover your list of users and populate the migration list.
Step 5 Agent Deployment
You have 2 choices for deploying the local agent: MSI Deployment for enterprise scenarios, or Click-Once Deployment for self-service installation.
MSI Deployment
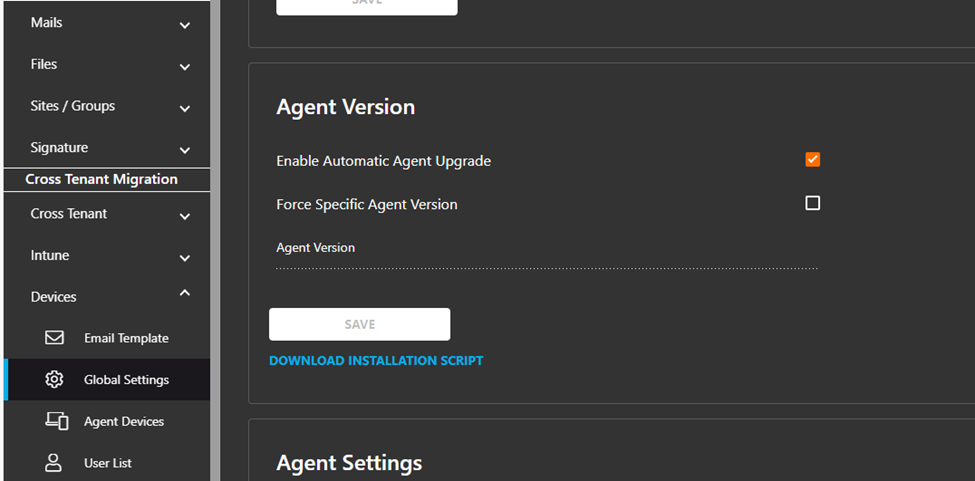
Best for enterprise deployments and non-admin users. You can download the installation script from Global Settings:
The deployment process is as follows:
- In Global Settings, download the installation script (as shown above).
- Modify the PowerShell script to add the user's email address and company key.
- Deploy using GPO, Intune, or other enterprise deployment methods.
MSI Installation Script
Basic installation script template:
$tmp = "$env:TEMP\CloudiwayAgent.msi"
$cdw = "$env:USERPROFILE\.cloudiway\agent"
Invoke-WebRequest "https://cloudiwaycdn.z13.web.core.windows.net/dev/CloudiwayAgent.msi" -OutFile $tmp

Start-Process C:\Windows\System32\msiexec.exe -ArgumentList "/i $tmp EMAIL=sourceEmail TARGETDIR=$cdw /qn COMPANYKEY=KEY;ALIAS" -Wait

Start-Process -FilePath "CloudiwayAgent.exe" -WorkingDirectory "$cdw" -Verb runAs
Local Deployment Script
We're providing an advanced script that you can use to automate your deployment and automatically inject the email address into the generic script.
$tmp = "$env:TEMP\CloudiwayAgent.msi"
$cdw = "C:\CloudiwayAgent"

$folder = "$env:USERPROFILE\.cloudiway"
if (Test-Path $folder) {
    Remove-Item -Path "$folder\*" -Recurse -Force
    Write-Host "All data in $folder has been deleted."
}
$folderWow64 = "C:\Windows\SysWOW64\config\systemprofile\.cloudiway"
if (Test-Path $folderWow64) {
    Remove-Item -Path "$folder\*" -Recurse -Force
    Write-Host "All data in $folderWow64 has been deleted."
}

$joinInfoPath = "HKLM:\SYSTEM\ControlSet001\Control\CloudDomainJoin\JoinInfo"

##########################################################################
# Try to find the user email address in the registry
# Note: Difficult task for shared devices.
#
# You can replace this code by a lookup in a reference file ( ComputerName;EmailAddress)
# And store this file at the same emplacement than the script.
# ComputerName;EmailAddress
# Computer1;[email protected]
# Computer2;[email protected]

##########################################################################
# Get all subkeys (tenant IDs)
$tenantKeys = Get-ChildItem -Path $joinInfoPath

foreach ($key in $tenantKeys) {
    $props = Get-ItemProperty -Path $key.PSPath
    $userEmail = $props.UserEmail
    if ($userEmail -and $userEmail -like "*@yourdomain.com") {  # TO BE REPLACED
        Write-Output $userEmail
        break
    }
}

Invoke-WebRequest "https://cloudiwaycdn.z13.web.core.windows.net/master/CloudiwayAgent.msi" -OutFile $tmp
Start-Process C:\Windows\System32\msiexec.exe -ArgumentList "/x $tmp /qn" -Wait
Start-Process C:\Windows\System32\msiexec.exe -ArgumentList "/i $tmp TARGETDIR=$cdw /qn COMPANYKEY=KEY;URL;$userEmail" -Wait  # TO BE REPLACED
Start-Process -FilePath "CloudiwayAgent.exe" -WorkingDirectory "$cdw" -Verb runAs


##################################################
# Define the task action
$exePath = "$cdw\CloudiwayAgent.exe"
$taskName = "CloudiwayAgentStartup"
$action = New-ScheduledTaskAction -Execute $exePath
# Define the trigger: at any user logon
$trigger = New-ScheduledTaskTrigger -AtLogOn
# Define the task settings
$settings = New-ScheduledTaskSettingsSet -AllowStartIfOnBatteries -DontStopIfGoingOnBatteries -Hidden
# Register the task (System-wide)
Register-ScheduledTask -Action $action -Trigger $trigger -TaskPath "\Cloudiway\" -TaskName $taskName -Description "Start Cloudiway Agent at login" -User "SYSTEM" -Settings $settings -RunLevel Highest -Force
Intune Deployment Script
This script is designed for deployment via Microsoft Intune. It downloads a computer-to-email mapping file, resolves the current device's email, installs the Cloudiway Agent MSI, and creates a scheduled task to run it at logon.
# ================== CONFIG ==================
$CompanyKey = "PUT-YOUR-GUID-HERE"                    # e.g. 07472af0-f6c7-42a3-afa9-8e2257ff441a
$PortalUrl = "https://connection-----api.cloudiway.com"  # confirm your exact portal URL
$TargetDir = "C:\CloudiwayAgent"                     # final install folder
$MsiUrl = "https://cloudiwaycdn.z13.web.core.windows.net/master/CloudiwayAgent.msi"
$MapUrl = "https://YOUR-STORAGE-URL/path/computer_email_list.txt"  # computer;email mapping
$TmpMsi = Join-Path $env:TEMP "CloudiwayAgent.msi"
$TmpMap = Join-Path $env:TEMP "computer_email_list.txt"
$LogRoot = "$env:ProgramData\Cloudiway\logs"
# ============================================

# Ensure log dir and transcript
New-Item -ItemType Directory -Force -Path $LogRoot | Out-Null
$Log = Join-Path $LogRoot "IntuneDeviceScript-CloudiwayAgent.log"
Start-Transcript -Path $Log -Append | Out-Null

try {
    Write-Host "Starting Cloudiway Agent deployment..."

    # Download the mapping file
    Write-Host "Downloading mapping file from $MapUrl"
    Invoke-WebRequest -Uri $MapUrl -OutFile $TmpMap -UseBasicParsing
    if (!(Test-Path $TmpMap)) { throw "Mapping file download failed: $TmpMap" }

    # Resolve email by computer name
    $currentComputer = $env:COMPUTERNAME
    $userEmail = ""
    foreach ($line in Get-Content -LiteralPath $TmpMap) {
        if (-not $line.Trim()) { continue }
        $parts = $line -split ";"
        if ($parts.Count -ge 2) {
            if ($parts[0].Trim().ToUpper() -eq $currentComputer.ToUpper()) {
                $userEmail = $parts[1].Trim()
                break
            }
        }
    }

    if (-not $userEmail) { throw "No matching email found for computer: $currentComputer" }
    Write-Host "Resolved user email: $userEmail"

    # Download MSI
    Write-Host "Downloading MSI from $MsiUrl"
    Invoke-WebRequest -Uri $MsiUrl -OutFile $TmpMsi -UseBasicParsing
    if (!(Test-Path $TmpMsi)) { throw "MSI download failed: $TmpMsi" }

    # Ensure target directory
    New-Item -ItemType Directory -Force -Path $TargetDir | Out-Null

    # Build uninstall args using the MSI file
    $uninstallArgs = "/x `"$TmpMsi`" /qn /norestart"
    Start-Process "$env:WINDIR\System32\msiexec.exe" -ArgumentList $uninstallArgs -Wait -PassThru

    # Install/Repair MSI (idempotent)
    $companyProperty = "$CompanyKey;$PortalUrl;$userEmail"
    $msiLog = Join-Path $LogRoot "CloudiwayAgent-msi.log"
    $installArgs = "/i `"$TmpMsi`" TARGETDIR=`"$TargetDir`" /qn COMPANYKEY=$companyProperty"
    Write-Host "Running msiexec install/repair..."
    Start-Process -FilePath "$env:WINDIR\System32\msiexec.exe" -ArgumentList $installArgs -Wait -PassThru

    # Verify exe exists
    $exe = Join-Path $TargetDir "CloudiwayAgent.exe"
    if (!(Test-Path $exe)) { throw "CloudiwayAgent.exe not found in $TargetDir" }

    # Create scheduled task (SYSTEM, run at any user logon)
    $taskName = "CloudiwayAgentStartup"
    $taskPath = "\Cloudiway\"
    try {
        $existing = Get-ScheduledTask -TaskName $taskName -TaskPath $taskPath -ErrorAction Stop
        Unregister-ScheduledTask -TaskName $taskName -TaskPath $taskPath -Confirm:$false
        Write-Host "Existing scheduled task removed."
    } catch { }

    $action = New-ScheduledTaskAction -Execute $exe
    $trigger = New-ScheduledTaskTrigger -AtLogOn
    $settings = New-ScheduledTaskSettingsSet -AllowStartIfOnBatteries -DontStopIfGoingOnBatteries -Hidden
    Register-ScheduledTask -Action $action -Trigger $trigger -TaskPath $taskPath `
        -TaskName $taskName -Description "Start Cloudiway Agent at login" `
        -User "SYSTEM" -Settings $settings -RunLevel Highest -Force | Out-Null

    # Optional: run once immediately
    Start-Process -FilePath $exe -WorkingDirectory $TargetDir

    Write-Host "Deployment completed successfully."
    Exit 0
}
catch {
    Write-Host "ERROR: $($_.Exception.Message)"
    Exit 1
}
finally {
    Stop-Transcript | Out-Null
}
Click-Once Deployment
Best for self-service scenarios where users can install the agent themselves.
The Click-Once deployment process:
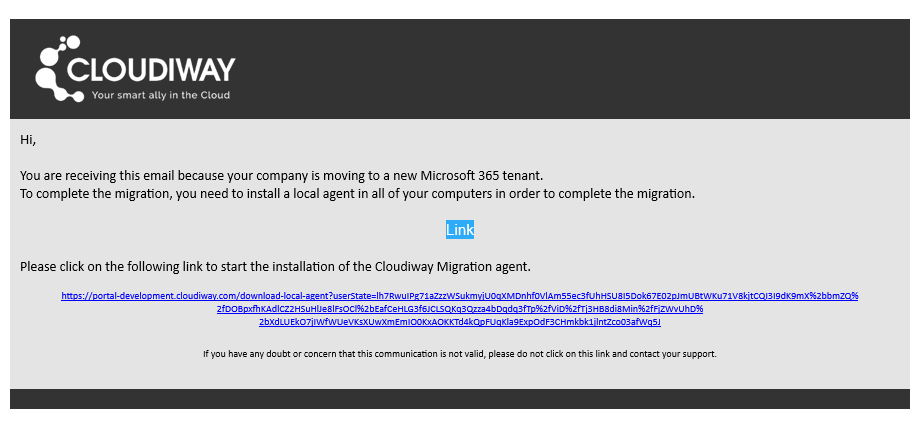
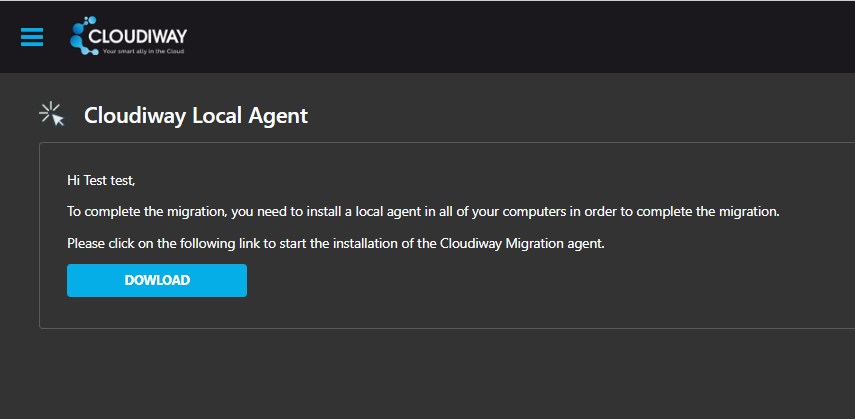
- From the User List, select users and click Send Mail.
- Users receive an installation link by email from the Cloudiway console.
- When clicked, the agent downloads and installs automatically via Click-Once.
Step 6 Migration Package
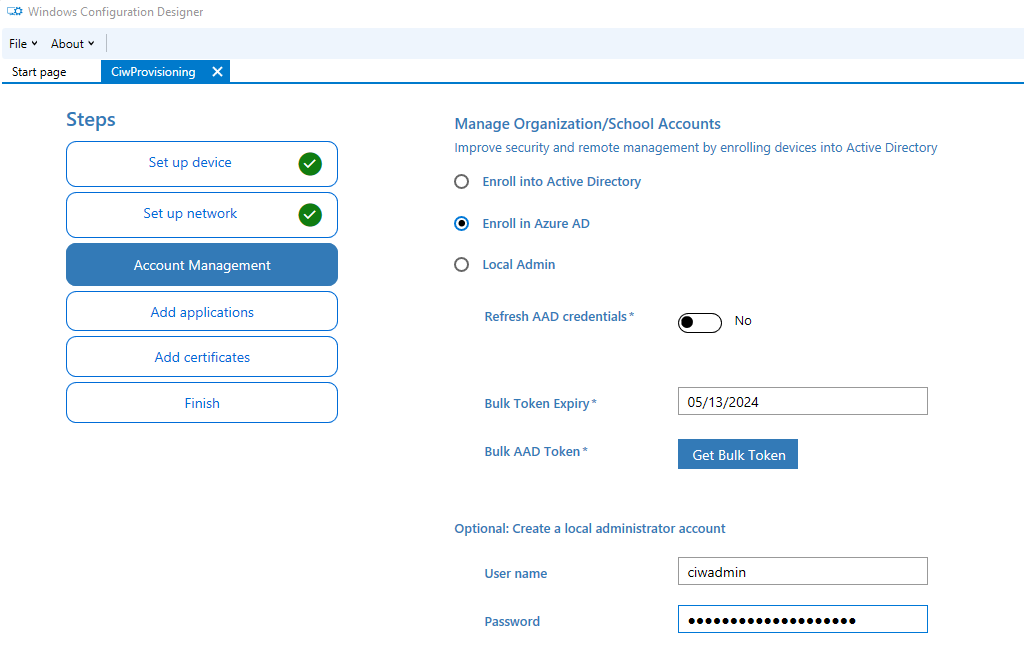
For Entra ID Joined device migration, you need to create and upload a Windows Provisioning Package that will join devices to the target tenant.
Creating the Provisioning Package
Use Windows Configuration Designer to create a provisioning package (.ppkg) that:
- Joins the device to your target Entra ID tenant
- Configures device settings as needed
- Sets up automatic enrollment in Intune (optional)
Step 7 Run Migration
Once agents are deployed and connected, you can start the migration from the User List.
- Select the users you want to migrate.
- Click on Migration.
- Choose to start immediately or schedule for a specific date and time.
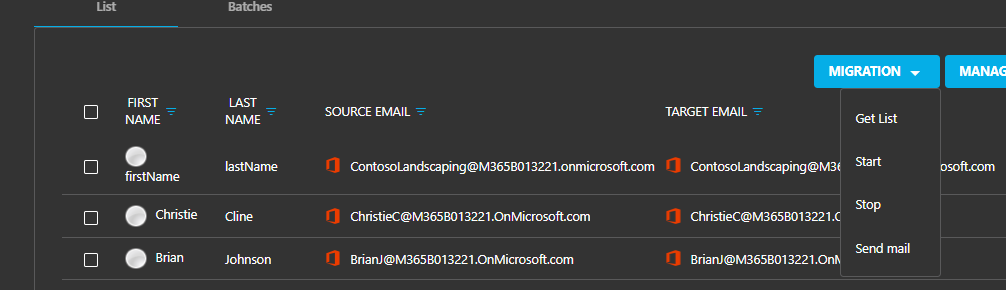
The agent will detect the scheduled migration and begin the process automatically when the time arrives.
Computer List
The Computer List shows all devices that have connected with the local agent, along with their migration status.
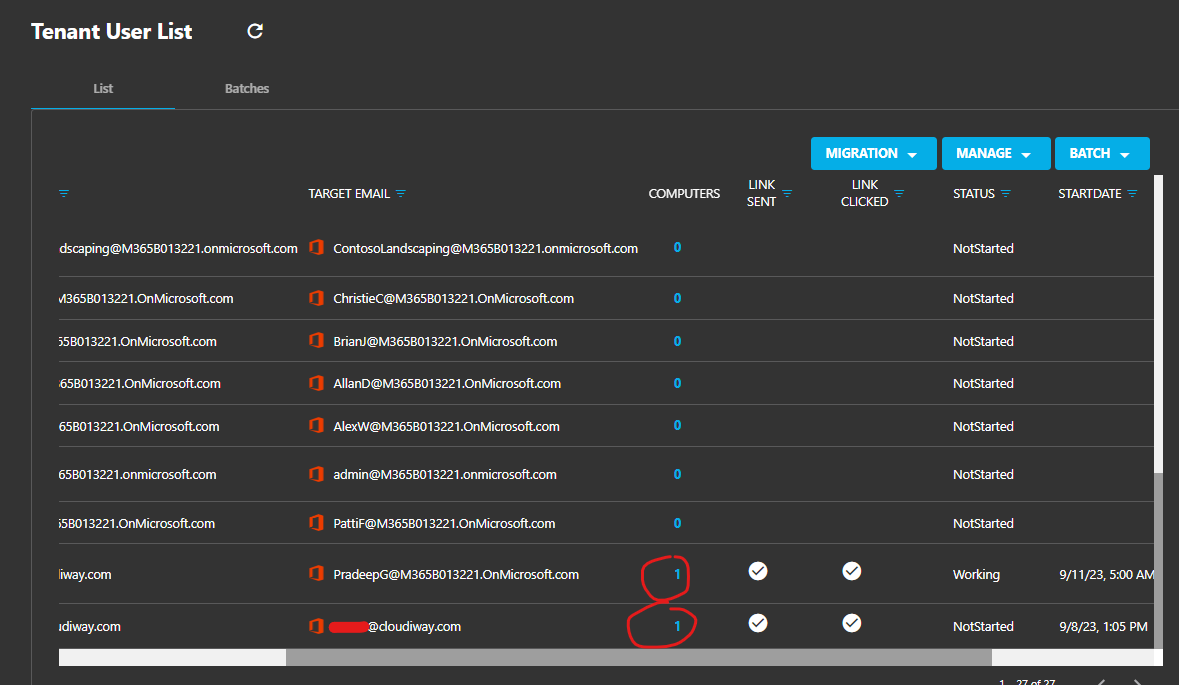
You can monitor:
- Device connection status
- Migration progress
- Error messages and logs
- Device details (name, OS version, etc.)
Hybrid Device Migration
This section provides complete step-by-step instructions for migrating Windows hybrid joined devices (joined to both on-premises Active Directory and Microsoft Entra ID) between two Microsoft 365 tenants using the Cloudiway agent.
This migration preserves the local AD identity, Windows user profiles, BitLocker keys, and Intune device policies for a secure, disruption-free process.
Step 1: Verify Hybrid Join Status & Prepare Source Devices
Check Device Join State
On each Windows device, run the following command to verify hybrid join status:
dsregcmd /statusConfirm AzureAdJoined: YES and DomainJoined: YES in the Device State section.
Agent Deployment via Intune
Install the Cloudiway migration agent on all source devices targeted for migration. Automated deployments can be performed via Intune using the following PowerShell script (DeployIntuneScript_RunAs_System.ps1) for scalability:
# ================== CONFIG ==================
$CompanyKey = "PUT-YOUR-GUID-HERE"                    # e.g. 07472af0-f6c7-42a3-afa9-8e2257ff441a
$PortalUrl = "https://connection-----api.cloudiway.com"  # confirm your exact portal URL
$TargetDir = "C:\CloudiwayAgent"                     # final install folder
$MsiUrl = "https://cloudiwaycdn.z13.web.core.windows.net/master/CloudiwayAgent.msi"
$MapUrl = "https://YOUR-STORAGE-URL/path/computer_email_list.txt"  # computer;email mapping
$TmpMsi = Join-Path $env:TEMP "CloudiwayAgent.msi"
$TmpMap = Join-Path $env:TEMP "computer_email_list.txt"
$LogRoot = "$env:ProgramData\Cloudiway\logs"
# ============================================

# Ensure log dir and transcript
New-Item -ItemType Directory -Force -Path $LogRoot | Out-Null
$Log = Join-Path $LogRoot "IntuneDeviceScript-CloudiwayAgent.log"
Start-Transcript -Path $Log -Append | Out-Null

try {
    Write-Host "Starting Cloudiway Agent deployment..."

    # Download the mapping file
    Write-Host "Downloading mapping file from $MapUrl"
    Invoke-WebRequest -Uri $MapUrl -OutFile $TmpMap -UseBasicParsing
    if (!(Test-Path $TmpMap)) { throw "Mapping file download failed: $TmpMap" }

    # Resolve email by computer name
    $currentComputer = $env:COMPUTERNAME
    $userEmail = ""
    foreach ($line in Get-Content -LiteralPath $TmpMap) {
        if (-not $line.Trim()) { continue }
        $parts = $line -split ";"
        if ($parts.Count -ge 2) {
            if ($parts[0].Trim().ToUpper() -eq $currentComputer.ToUpper()) {
                $userEmail = $parts[1].Trim()
                break
            }
        }
    }

    if (-not $userEmail) { throw "No matching email found for computer: $currentComputer" }
    Write-Host "Resolved user email: $userEmail"

    # Download MSI
    Write-Host "Downloading MSI from $MsiUrl"
    Invoke-WebRequest -Uri $MsiUrl -OutFile $TmpMsi -UseBasicParsing
    if (!(Test-Path $TmpMsi)) { throw "MSI download failed: $TmpMsi" }

    # Ensure target directory
    New-Item -ItemType Directory -Force -Path $TargetDir | Out-Null

    # Build uninstall args using the MSI file
    $uninstallArgs = "/x `"$TmpMsi`" /qn /norestart"
    Start-Process "$env:WINDIR\System32\msiexec.exe" -ArgumentList $uninstallArgs -Wait -PassThru

    # Install/Repair MSI (idempotent)
    $companyProperty = "$CompanyKey;$PortalUrl;$userEmail"
    $msiLog = Join-Path $LogRoot "CloudiwayAgent-msi.log"
    $installArgs = "/i `"$TmpMsi`" TARGETDIR=`"$TargetDir`" /qn COMPANYKEY=$companyProperty"
    Write-Host "Running msiexec install/repair..."
    Start-Process -FilePath "$env:WINDIR\System32\msiexec.exe" -ArgumentList $installArgs -Wait -PassThru

    # Verify exe exists
    $exe = Join-Path $TargetDir "CloudiwayAgent.exe"
    if (!(Test-Path $exe)) { throw "CloudiwayAgent.exe not found in $TargetDir" }

    # Create scheduled task (SYSTEM, run at any user logon)
    $taskName = "CloudiwayAgentStartup"
    $taskPath = "\Cloudiway\"
    try {
        $existing = Get-ScheduledTask -TaskName $taskName -TaskPath $taskPath -ErrorAction Stop
        Unregister-ScheduledTask -TaskName $taskName -TaskPath $taskPath -Confirm:$false
        Write-Host "Existing scheduled task removed."
    } catch { }

    $action = New-ScheduledTaskAction -Execute $exe
    $trigger = New-ScheduledTaskTrigger -AtLogOn
    $settings = New-ScheduledTaskSettingsSet -AllowStartIfOnBatteries -DontStopIfGoingOnBatteries -Hidden
    Register-ScheduledTask -Action $action -Trigger $trigger -TaskPath $taskPath `
        -TaskName $taskName -Description "Start Cloudiway Agent at login" `
        -User "SYSTEM" -Settings $settings -RunLevel Highest -Force | Out-Null

    # Optional: run once immediately
    Start-Process -FilePath $exe -WorkingDirectory $TargetDir

    Write-Host "Deployment completed successfully."
    Exit 0
}
catch {
    Write-Host "ERROR: $($_.Exception.Message)"
    Exit 1
}
finally {
    Stop-Transcript | Out-Null
}
Step 2: Deregistration from Source Tenant
Update Azure AD Connect Configuration
- In the source tenant, open Azure AD Connect.
- Go to Domain & OU Filtering and uncheck the Organizational Unit (OU) containing the computer objects.
- Save changes and wait for the next Azure AD Connect sync (typically 30-60 minutes).
- Verify the devices are removed from the source Entra/Azure AD.
Run Cloudiway Device Migration Agent
- Initiate migration from the Cloudiway Portal.
- During this step, the agent:
- Unregisters the device from the source tenant in Entra ID
- Unenrolls the device from source Intune
- Retains its local AD join and Windows profile
User Login
Post-migration, users may need to log in again to core applications (Office, OneDrive, Teams) with their target tenant credentials.
Step 3: Cutover to Target Tenant
Preparation in Target Tenant
- In Azure AD Connect of the target tenant, include the device in the OU filtering to synchronize it.
- Set up the Service Connection Point (SCP) in the target domain for hybrid Azure AD join.
Rerun the Cloudiway Agent
The agent performs the following actions:
- Removes legacy Office license bindings and cleans up OneDrive/Outlook profiles tied to the source tenant.
- Initiates hybrid re-enrollment into the target tenant. This can be triggered by the agent or via device reboot.
- Once Azure AD Connect synchronizes, verify that the device appears in the target tenant.
Verification
On each device, run:
dsregcmd /statusConfirm AzureAdJoined: YES for the target tenant.
- Verify SCP configuration and Azure AD Connect OU filtering.
- Check Event Viewer logs under "User Device Registration."
- If necessary, remove stale device entries manually from the source tenant.
Force Office Sign-out Script
Execute the following script (ForceSignoutOffice.ps1) as needed to enforce user sign-out of Office apps before relaunching with new credentials:
$ErrorActionPreference = 'Stop'

$tmp = Join-Path $env:TEMP 'CloudiwayAgent.msi'
$cdw = Join-Path $env:USERPROFILE '.cloudiway\agent'
New-Item -ItemType Directory -Path $cdw -Force | Out-Null

Invoke-WebRequest "https://cloudiwaycdn.z13.web.core.windows.net/master/CloudiwayAgent.msi" -OutFile $tmp

# Uninstall previous (if installed)
Start-Process "$env:WINDIR\System32\msiexec.exe" -ArgumentList "/x `"$tmp`" /qn" -Wait

# Install to desired folder
Start-Process "$env:WINDIR\System32\msiexec.exe" -ArgumentList "/i `"$tmp`" TARGETDIR=`"$cdw`" /qn" -Wait

# Run the agent and WAIT until it finishes
$p = Start-Process (Join-Path $cdw 'CloudiwayAgent.exe') `
    -ArgumentList '/SignoutOffice' `
    -WorkingDirectory $cdw -NoNewWindow -PassThru -Wait
Write-Host "CloudiwayAgent exited with code $($p.ExitCode)"

# Now it's safe to uninstall the MSI
Start-Process "$env:WINDIR\System32\msiexec.exe" -ArgumentList "/x `"$tmp`" /qn" -Wait

# Optional cleanup
Remove-Item $tmp -Force
This script downloads the Cloudiway agent, runs it with the /SignoutOffice parameter to force sign-out from all Office applications, then cleans up.
Best Practices for Hybrid Migration
- Staged migration: Start with registered-only devices (least complex), followed by joined, then hybrid joined devices which may have more dependencies.
- Broad deployment: Deploy the Cloudiway agent broadly for automation and monitoring via the Cloudiway administration console.
- Post-migration validation: Validate device, user profile, and BitLocker status post migration to ensure compliance and business continuity.
- Policy migration: Ensure Intune and co-management policies are migrated between tenants as needed to preserve device security posture.
When and How to Perform the Domain Switch?
If you are doing a tenant to tenant migration and you have to migrate your domains to the target tenant, you'll wonder when to transfer the domain name: before or after the migration of the devices to the new tenant.
The answer is that you can migrate the domain before or after the migration of the laptops.
Migrating Laptops Before Domain Migration
If you migrate the laptops before the migration of the domain, you don't have to do anything particular.
Migrating Domains Before Laptop Migration
If you migrate the domains before triggering the migration of the laptops, the Cloudiway user list will become incorrect as the source and target email addresses recorded in the Cloudiway user list will not match anymore the email addresses of your users in the source and target tenant.
Troubleshooting
The main issue that you may encounter is if your device fails to join the new tenant.
Provisioning Package Issues
This may happen if your provisioning package is not working. We recommend testing it before uploading it to Cloudiway.
Common Issues
- Agent not connecting: Verify the Company Key and Personal Access Token are correct.
- Migration not starting: Ensure the user is logged in and the scheduled time has been reached.
- Device not joining target: Check the provisioning package configuration and ensure the temporary local admin is enabled.
- OneDrive sync issues: Verify the user has a valid license in the target tenant.
Knowledge Base
Cloudiway provides an extensive knowledge base with many resources, including common error messages, video guides, and downloads.
Please visit the knowledge base here: Cloudiway Help Center
Support
Support tickets are opened through the platform. Once logged in, go to your project and select Help, then Support. The chatbot will ask you a couple of questions and then open a support ticket. You will receive an email response to your ticket, and you can continue the support by email.
More information regarding our support program is available here: Cloudiway Support
Frequently Asked Questions
What does the laptop migration tool do?
The tool unregisters or unjoins the device from the source tenant, migrates Office licenses, OneDrive sync settings, and Outlook profiles. Then it joins the device to the target tenant using a provisioning package.
Does the user need to be logged in for migration?
Yes, the user must be logged in for the migration to take place. Key settings are stored in the user's profile under HKEY_CURRENT_USER, so a user session is required.
Can non-admin users install the migration agent?
For Entra ID Joined devices, the user must be administrator of the device for self-service installation. If users are not administrators, the agent must be deployed by an administrator using MSI deployment via GPO, Intune, or other methods.
What is the temporary local administrator account?
It's a local administrator account named CloudiwayMigration that is created during migration and deleted when completed. It provides a fallback login method if there are issues joining the target tenant.
Can I migrate Entra ID Registered and Joined devices?
Yes, both Entra ID Registered and Entra ID Joined devices can be migrated. Click-Once deployment works for Registered devices, while MSI deployment is required for Joined devices.
Can I migrate Hybrid Entra ID joined devices?
Yes, hybrid scenarios are supported. The Cloudiway agent unjoins the device from the source tenant. As administrator, you then configure the hybrid join with the new tenant, and the device will automatically rejoin through your hybrid setup.
Which licenses do I need?
You need a global Cross-Tenant migration license. It is a yearly subscription. Please contact sales to get a complete quote.
Get a free migration quote in minutes — entirely self-service.