MICROSOFT TEAMS TO TEAMS
MIGRATION GUIDE
1. Introduction to Cross Tenant Microsoft Teams Migration
Cloudiway’s Cross Tenant Teams migration solution helps businesses perform technical migrations through a simple SaaS interface. As a result, Teams migrations require no additional software installation or overhead, and migrations can be performed securely and quickly.
This guide is aimed at experienced system administrators who are capable of connecting to remote systems and using a variety of administration tools.
The Cloudiway Platform allows migrating the Microsoft Teams and the Office 365 unified Groups between tenants.
1.1. Cross Tenant Microsoft Teams migration : What is migrated
You will find the list of what can be migrated on this page: Microsoft Teams Migration.
1.2. Cross Tenant Microsoft Teams migration : Performance & Security
For more information about security, please refer to this article.
For more information about migration performance, please refer to this article.
1.3. License Management
Cloudiway platform automatically assigns the licenses, for more details regarding the license management, check out this page.
1.4. Delta Passes
Delta migration is a Cloudiway functionality that allows you to migrate incrementally. Changes are migrated during delta passes. Deletions are not propagated.
1.5. Support
Although we provide support for our own products, we do not provide support for third-party products such as PowerShell or server administration of Microsoft products.
If you are concerned you might have any difficulty completing the steps for performing your Microsoft Teams to Teams migration, please consider a solution with our consulting team, contact us. This will ensure a fast, cost-effective, and stress-free implementation.
2. Prerequisites
The Cross Tenant Microsoft Teams Migration uses a mix of Graph APIs and CSOM calls. Therefore it requires to configure specific permissions at the source and at the target to execute Graph and CSOM calls.
2.2. Source Prerequisites
2.3.1 Create a source Microsoft 365 service account
First, we recommend to create an account dedicated to the migration, that can be deleted once the migration is completed.
- The migration account needs an Office 365 Teams License.
- For CSOM access, it must be SharePoint administrator.
- It must not be configured with multi-factored authentication (MFA) or SSO (ADFS).
- To perform the migration, the migration account needs to be an Owner and a Member of the Group/Team, in the source and in the target. If your source migration account is not Owner and Member of the Team, the migration engine will add it automatically.
2.3. Target Prerequisites
2.3.1 Create a target Office 365 service account
We recommend to create an account dedicated to the migration, that can be deleted once the migration is completed.
- The migration account needs an Office 365 Teams License.
- It must be SharePoint administrator.
- It must not be configured with multi-factored authentication (MFA) or SSO (ADFS).
Cloudiway automatically creates the team, therefore it doesn’t have to exist prior to the migration. If it already exists, it will be used and data appended to it.
2.3.2. Source Azure Active Directory Application
Graph APIs calls are performed through an Azure Active Directory Application which is granted specific permissions.
You can either create an Azure Active Directory Application manually or let the platform create one for you.
Please consult how to create the Azure Active Directory Application and associated permissions.
2.3.2. Target Azure Active Directory Application
Graph APIs calls are performed through an Azure Active Directory Application which is granted specific permissions.
You can either create an Azure Active Directory Application manually or let the platform create one for you.
Please consult how to create the Azure Active Directory Application and associated permissions.
2.2. Mapping Table
In Microsoft Teams, there are permissions and metadata (createdby, modifiedby, etc.) that contain email addresses. During the migration, these addresses must be converted into target accounts.
To achieve this, Cloudiway uses a mapping table to perform the conversion.
Important: the mapping table must be exhaustive, any missing email address will not be converted, and would end up with loss of file permissions and metadata. Cloudiway automatically populates this mapping table when source users are discovered by Get List functionality from Mail or File sections. However, make sure if the mapping table was populated automatically that you are not missing any email address.
3.Create Your Microsoft Teams Connectors
To facilitate the cross tenant Microsoft Teams migration, the Cloudiway platform needs to be able to communicate with both your source and target domains. To do this, Cloudiway uses connectors. You will need to set up a connector for each source tenant and each target tenant. Please refer to this page to configure your connectors.
For large projects, it’s possible to create multiple connectors that will be used in parallel. Please contact Cloudiway consulting services if you need to set up such configuration.
4. Cross Tenant Microsoft Teams Migration Settings
Note: to test the migration, you can use a Trial License, please consult this article to assign a Trial License.
4.1. Import Your Group List Into The Cloudiway Platform
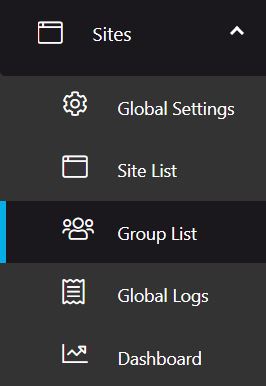
To perform the Cross tenant Microsoft Teams migration, navigate to Sites > Group List
You have 3 different methods to fill the list:
4.1.1. Option 1: Get List
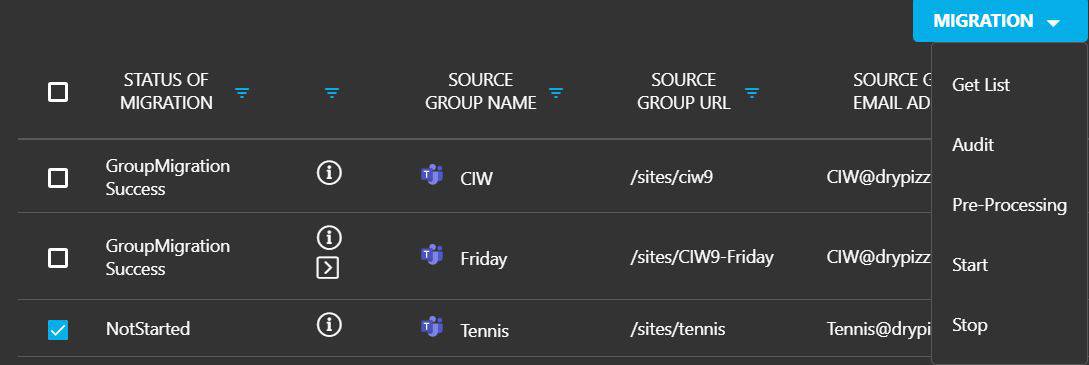
The Get List entry under the MIGRATION menu connects to the source and retrieves the full list of teams and unified groups.
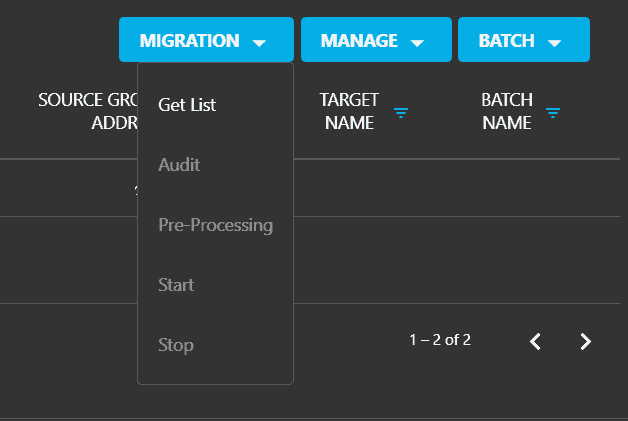
This is a useful tool which provides you with a complete picture of groups and teams to be migrated.
Select the connector you want to connect, click on GET.
Note: you can monitor the progress of this task in the Global Logs.
Once the job is completed, the list displays all the teams. Next, you need to assign a target connector to all the entries.
Select the entries, click on MANAGE, then Assign Target.
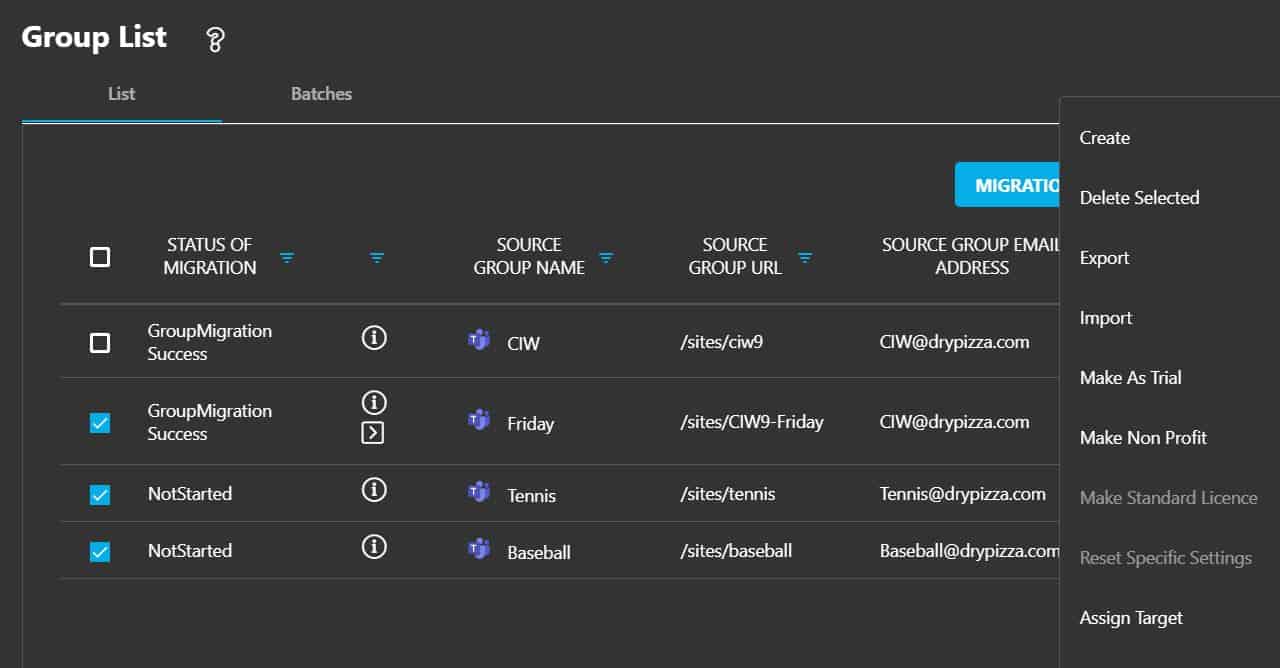
Select the connector, click on Assign.
Note: if your discovery has found unified groups, you can either migrate to unified groups or Microsoft Teams. You can change the target with the option MANAGE, Change Target Recipient, and select unified groups or teams.
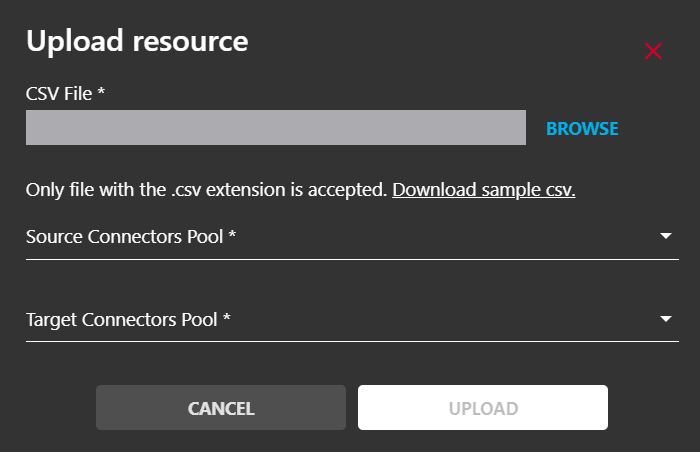
4.1.2. Option 2: CSV file import
If you have a CSV file of all your teams, you can upload the file to Cloudiway.
How To Fill The Users/Groups CSV File?
Click on MANAGE, Import, select the CSV File, the Source and Target Connectors, then click Upload.
4.1.3. Option 3: Create an entry manually
Many of our first-time customers create a single team for testing purposes.
Click on MANAGE, Create.
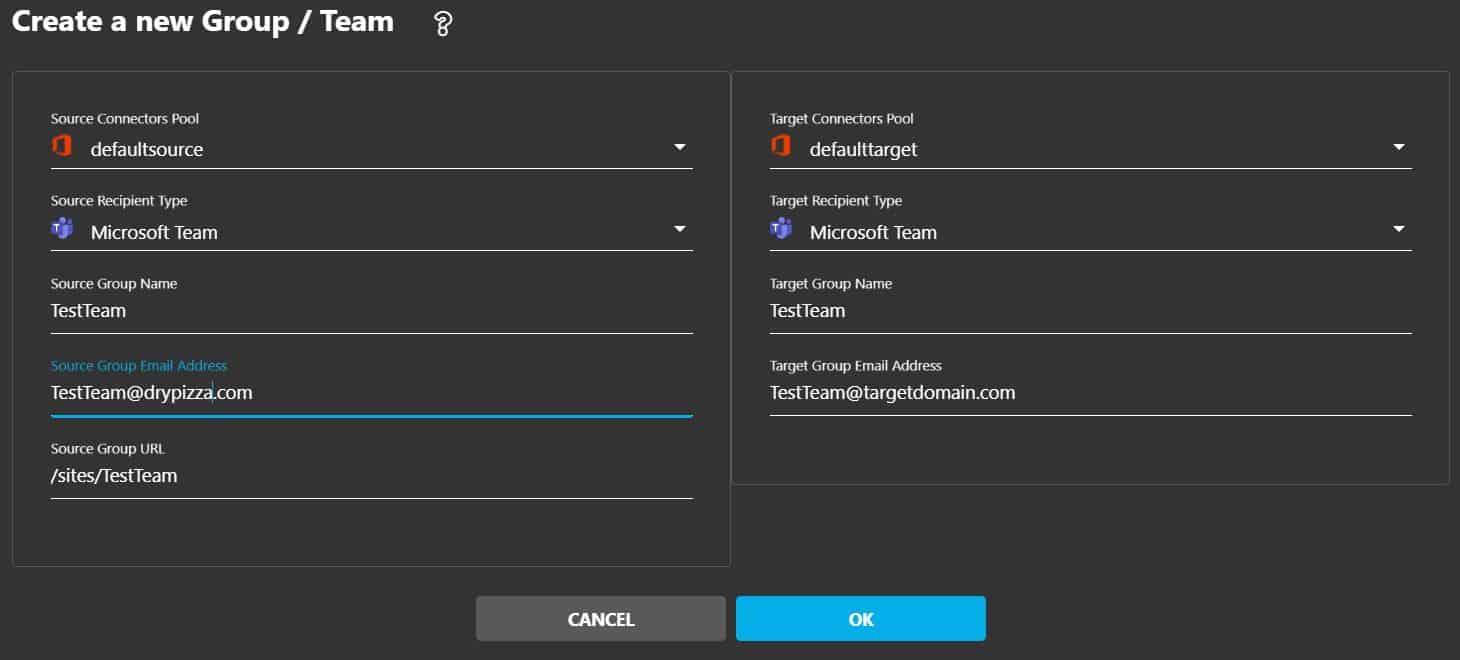
- Source Connectors Pool: Select the pool of connectors.
- Target Connectors Pool: Select the pool of connectors.
- Source Recipient Type: Select Microsoft Team or Unified Group.
- Target Recipient Type: Select Microsoft Team or Unified Group.
- Source Group Name: Enter the name of the team to migrate.
- Target Group Name: Enter the name of the team that you want to create (the name can be different).
- Source Group Email Address: Enter the email address of the team.
- Target Group Email Address: Enter the email address of the team as you want it to be created at the target.
- Source Group URL: Enter the relative URL of the SharePoint site of the team.
Click on OK.
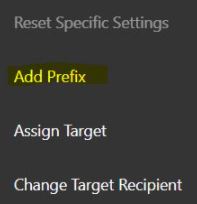 Add a Prefix to the Target?
You can add a Prefix to the Target Group Name and the Target Group Email Address.
In the Group List, check one or multiple objects, go to MANAGE then click on the “Add Prefix” button.
Enter the Prefix in the pop-up then SAVE.
4.2. Global Settings
At this point, you are ready to start your Microsoft teams to teams migration between tenants
You can review the settings in Global Settings.
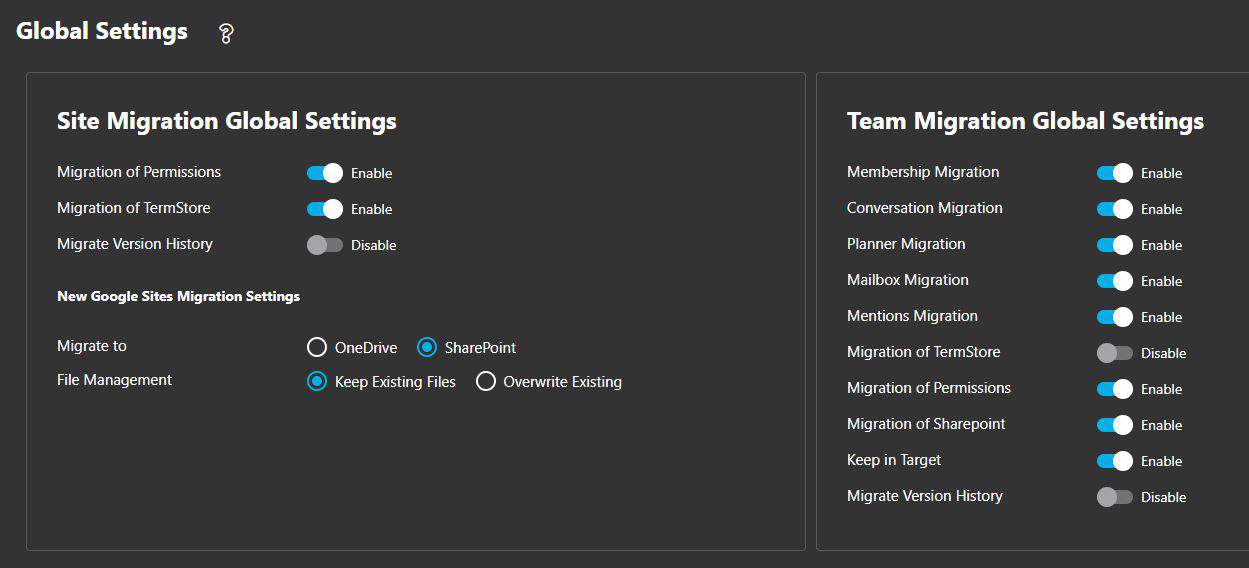
- Migration of Permissions.
- Migration of TermStore: TermStore is a SharePoint feature that doesn’t exist in Google. Therefore, it’s not used for Google Sites migration.
- Migrate Version History. Only the last 3 versions are migrated over.
- Migrate to: determine where files are migrated, we recommend to migrate to SharePoint. Files will be migrated to the SharePoint site.
- File Management: when you migrate to an existing destination, determine the behavior when files already exist on the target and is not empty.
- Overwrite
- Ignore
- Copy
| Membership Migration | Enable the migration of team members |
| Conversation Migration | Enable the migration of channel Conversations, read more. |
| Planner Migration | Enable the migration of Planners |
| Mailbox Migration | Enable the migration of team mailboxes |
| Mentions Migration | Enable the migration of Mentions |
| Migration of TermStore | Enable the migration of TermStore, therefore you can safely leave it Off by default unless you have customized it. |
| Migration of Permissions | Enable the migration of Permissions (files permissions…) |
| Migration of Sharepoint | Enable the migration of SharePoint sites associated to the team |
| Keep in target | Keep files if already present at the target (existing files will not be overwritten) |
- Click on Save.
4.3. Perform an Audit (optional)
The audit is optional and purely informative. It consumes the Cloudiway license. You do not have to run it, unless you wish to see how many Channels, files and folders you have in the source Microsoft Team. This feature reports information about the Source team:- Number of channels,
- Number of conversations in each channel,
- Number of files per channel,
- Number of members
The  icon indicates a private channel. Please see this article to learn more about how to migrate private channels.
4.4. Perform Pre-Processing
The pre-processing tool creates the team at the target if it doesn’t already exist.
What does the pre-processing tool in detail?
At the source:
It uses the graph APIs (Client ID and Client Secret) and gives the owner role to the migration account defined in the source connector. This ensures that the migration account will have all the necessary permissions during the migration.
At the target:
It creates the Team (or unified Group) and the associated SharePoint modern site with the credential defined in the target connector.
- It uses the graph APIs (Client ID and Client Secret) and gives the owner role to the migration account defined in the target connector.
- It migrates membership and ownership.
- It creates the SharePoint libraries that may have been manually created.
To pre-process a team, in Group List, select it and click on MIGRATION, Pre-Processing.
The group or team is now ready to be migrated.
4.5. Migration
Note on Migration: Cloudiway is leveraging Microsoft Teams Import Apis to maximize throughput.
This Microsoft article explains how it works : import-external-messages-to-teams
Cloudiway has integrated these apis. Checkout this article to see how it is implemented in the platform.
Before starting the Microsoft Teams to Teams migration, you must run the pre-processing (see step above) of the team.
To start the migration, in Group List, select it and click on MIGRATION, Start.
This will schedule the migration. The migration will start as soon as there is a free spot on the platform.
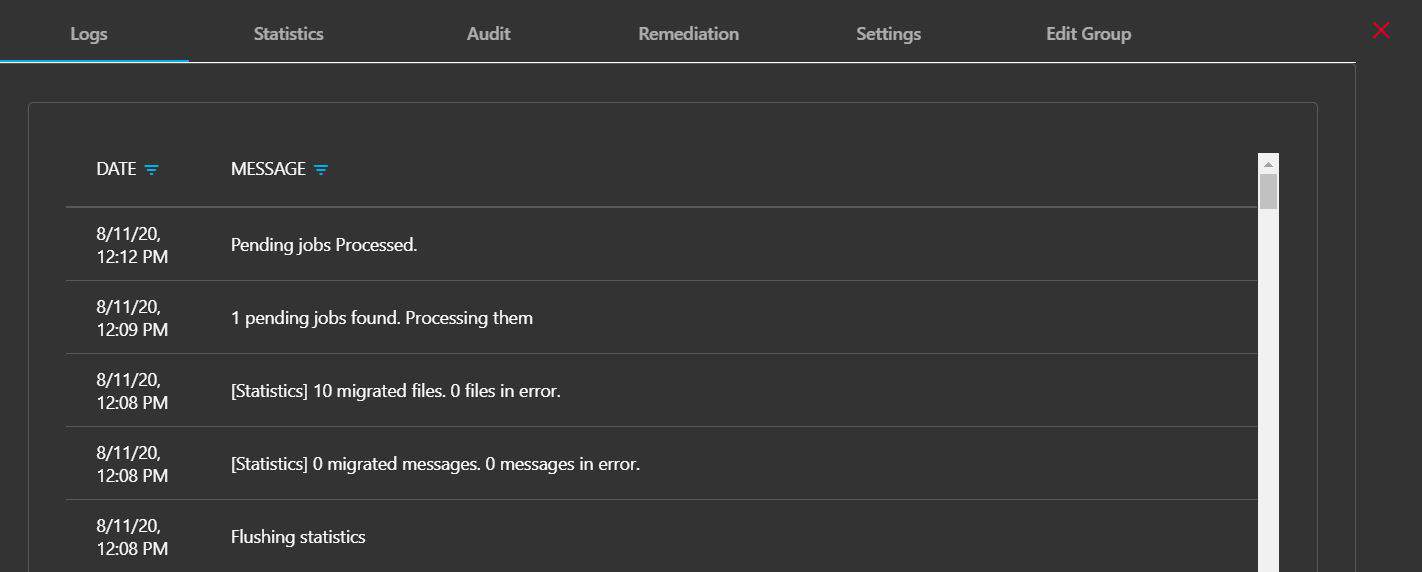
You can monitor your migration by clicking on the team in the list.
5. Troubleshooting
Cloudiway provides an extensive knowledge base with many resources, including common error messages, video guides, and downloads.
Please visit the knowledgebase here: https://help.cloudiway.com/